
How to Build a Squarespace website: Squarespace Website Tutorial For Beginner.
When you're thinking about building a website, lots of questions come to mind. How much does it cost? How time-consuming is the process? What technologies do I have to learn? Can't I just…do nothing, instead? ... But not with Squarespace!
If you are looking to build a professional website that will take a few days to set up, is budget-friendly, and sure doesn't require you to know a line of code, you need a website builder! And Squarespace tops the list of the best website builders available.
I am all about Squarespace, and I am here to take you through how to build your Squarespace website in 10 steps. I included an explanatory video and a lot of pictures to guide you along the way. Let's go!

Looking for a unique website design for your business? Explore our Squarespace Web Design packages for a stunning website. Need to enhance your site's visibility? Our Squarespace SEO services are here to assist you. Curious about our work? Take a look at our Squarespace website designer portfolio for some inspiration!
Squarespace Website Tutorial For Beginner
Getting Started
If you are new to Squarespace website builder, the first thing you'll need to do is head over to Squarespace.com and click Get Started.

You don't have to worry about payment right now because Squarespace offers a two-week trial (without inputting card details) to try out their features. Luckily, you can start building your own website on the free trial. If you're building an eCommerce site, I'd advise you to choose a commerce plan to have access to the premium feature. If not, click on Get Started to keep moving.
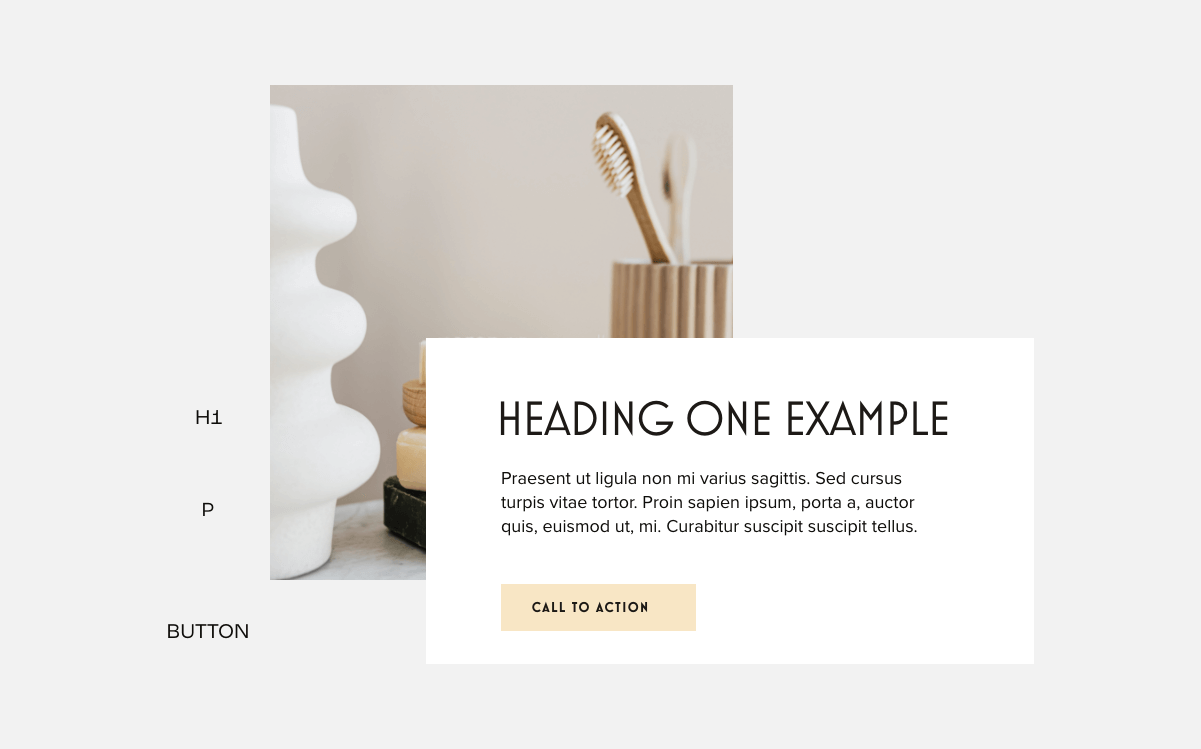
Step 1: Choose a Template
Once you click on Get Started, you will be directed to a page where you can pick your website template.
These templates are categorized by types, topics, and popular design. Under Types, you can specify your business. There is an online store, portfolio page, blog, and likes. Templates can also be sorted using topics like popular designs, restaurants, events, home & decor, and so on.
Now, here is what you should note of when choosing templates.
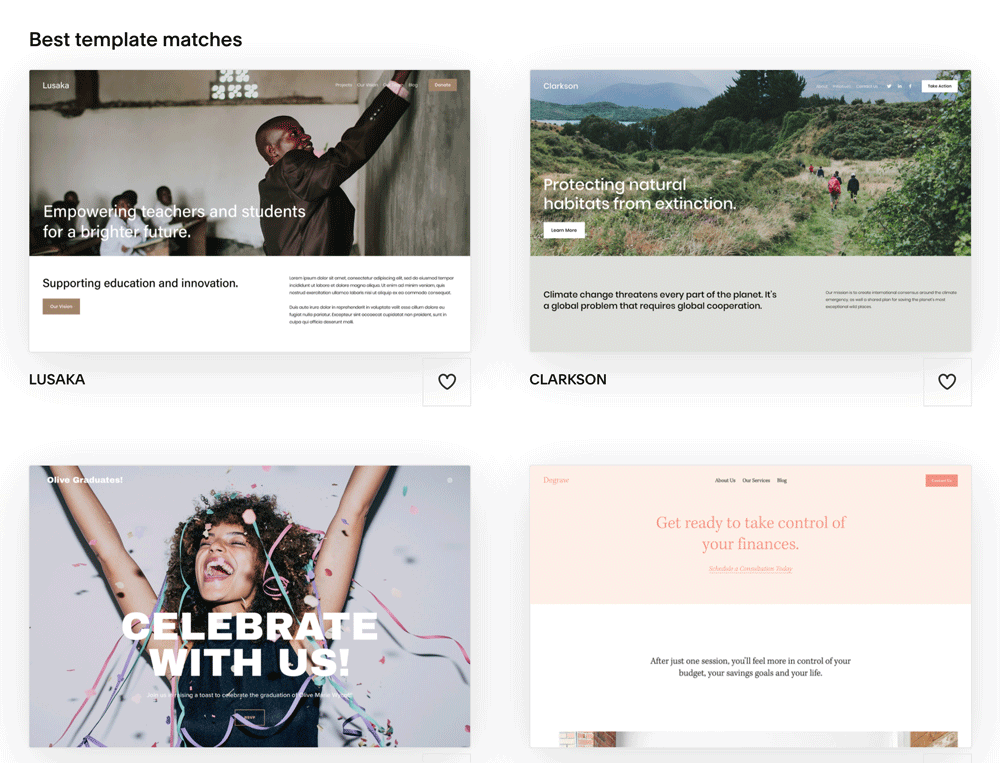
All templates on Squarespace 7.1 have the same base, i.e. they can be customized to look like any other template selection.
Select the best category that fits your type of business.
If you have more than one favorite, try previewing each of them until you decide on your best template. To preview, hover over the template you like and click on the Preview template that comes up.
When confused, settle with one.
Once you've finally decided on the Squarespace template you want to go for, hover over it and click Start with 'template name'. In my own case, I will be going with this real estate template called Hidano.
Step 2: Create a Squarespace account
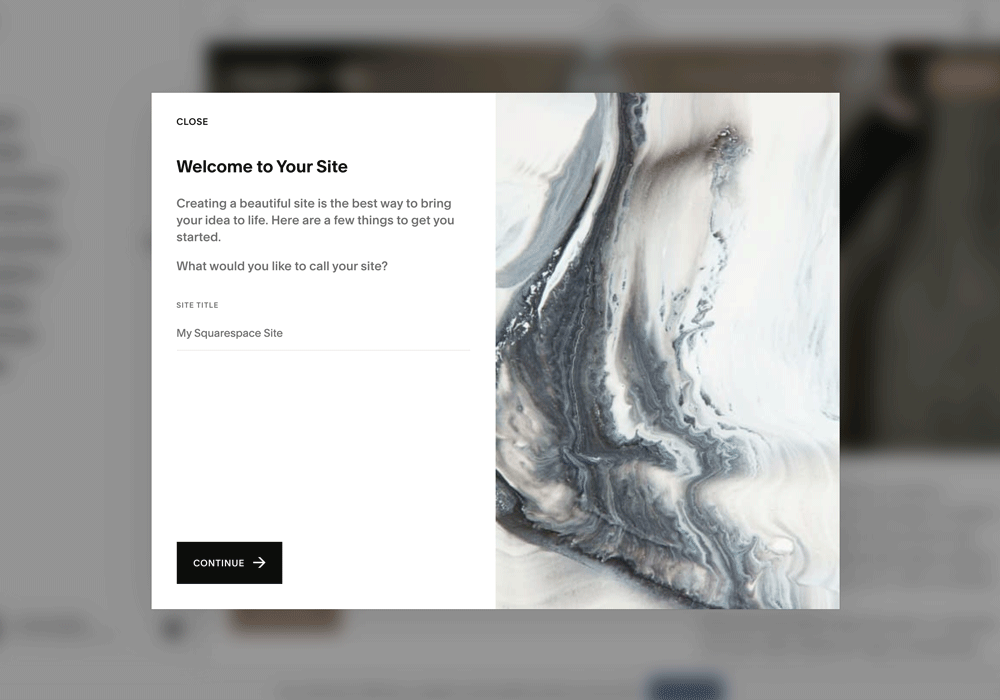
Now that you've selected your template, the next thing you will be asked to do is create a Squarespace account or log in. You have an option to continue with email, where you will have to drop an email and create a password or continue with a Google account, Apple account, or Facebook.
Once you've done that, there will be a pop-up menu instructing you to input your site name, you can decide to input your personal or business name depending on what the purpose of your website is. You can always edit site header whenever you want to.
Next, there will be some set of slides that will walk you through how to navigate and edit your site. Only ignore this if you've already watched a detailed Squarespace tutorial video on how to use Squarespace. If not, it's best to pay close attention to the slides.
Welcome to Squarespace editor! From here, you can make all necessary changes to your Squarespace website.
How to edit Squarespace website
Step 3: Set up Pages

Now that you've successfully created your website with Squarespace, it's time to add pages to your website. To make the process faster, try preparing everything you will need to build your website. Some things you should put in place are:
The number of features and pages your website will contain.
Copy or content for each page
Images, color palette, and fonts for your website.
To find out the best font combination for your business, check out this
16 Best Squarespace Font Combinations For Your Business Once that is done, you can proceed to set up your pages.
Add New Pages
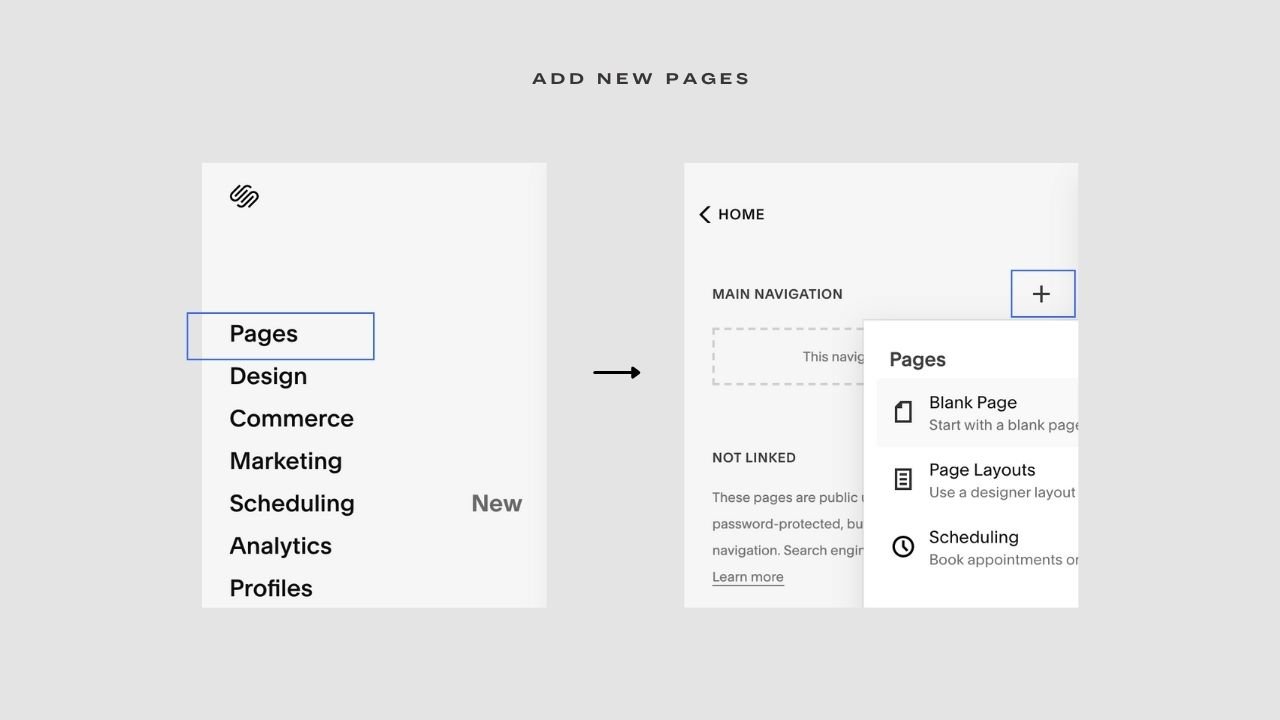
Once you've determined the type of pages you'd like to add, it's time to add them. To create a new page, go to the backend of your website and click Pages. You will be directed to the Page settings, click on the plus icon beside 'Main Navigation'.
When you click on the plus icon, there are varieties of options to choose from. You can decide to create a blank page if you want to start from scratch, or go for the page layouts option.
In the page layouts, popular pages such as Contact page, services, teams, etc. have been outlined to save your time. You get to create a portfolio, store, event, or blog from the collections. Yes, Squarespace has made it super easy to create pages.
Here's how we created a portfolio page for the Squarespace site.
Go to Pages
Click on the plus icon near the main navigation
Select Portfolio and select any of the styles you want.
Voilà! Our Portfolio page is ready.
Removing a page
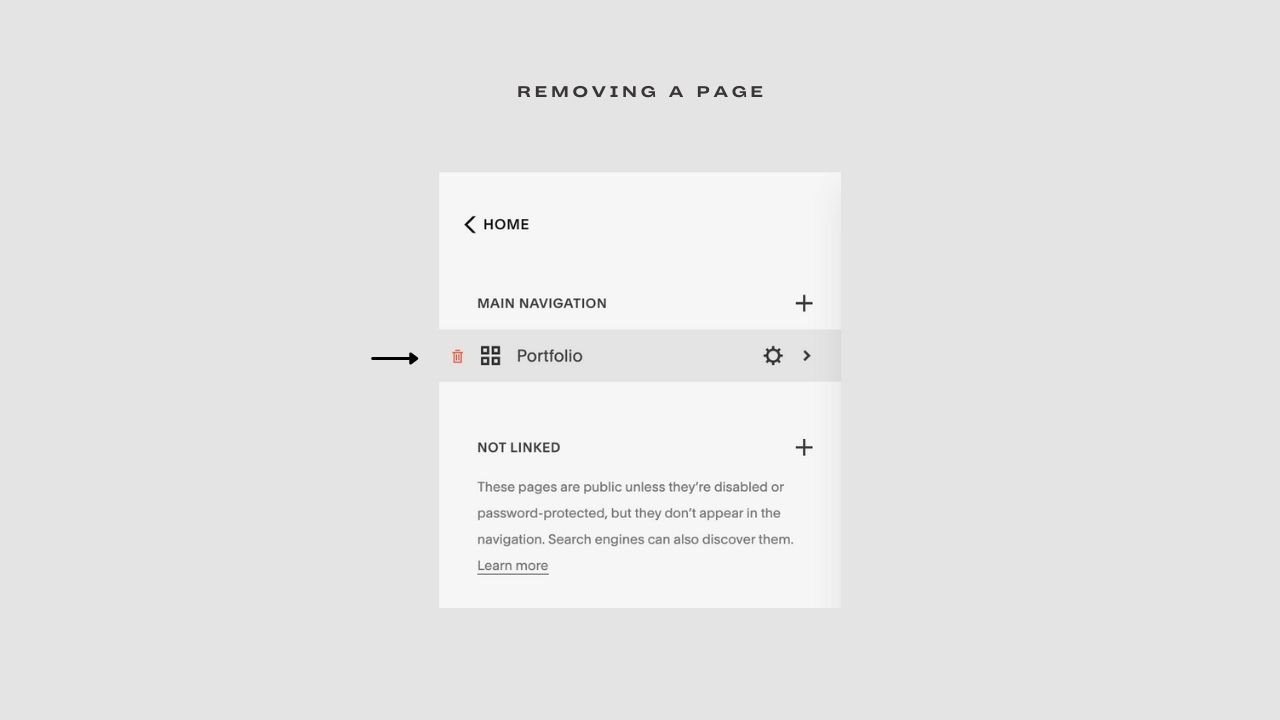
Sometimes, a page just needs to be removed. To delete pages, hover over the page and a garbage bin will appear at the left, click on it to delete the selected page.
Deleted a page by mistake and would like to retrieve it back? Click Pages, scroll down to the bottom and click on the trash can icon. Hover over the deleted page and click Restore. The restored page will then appear in the NOT LINKED section of your website.
Creating a sub-menu
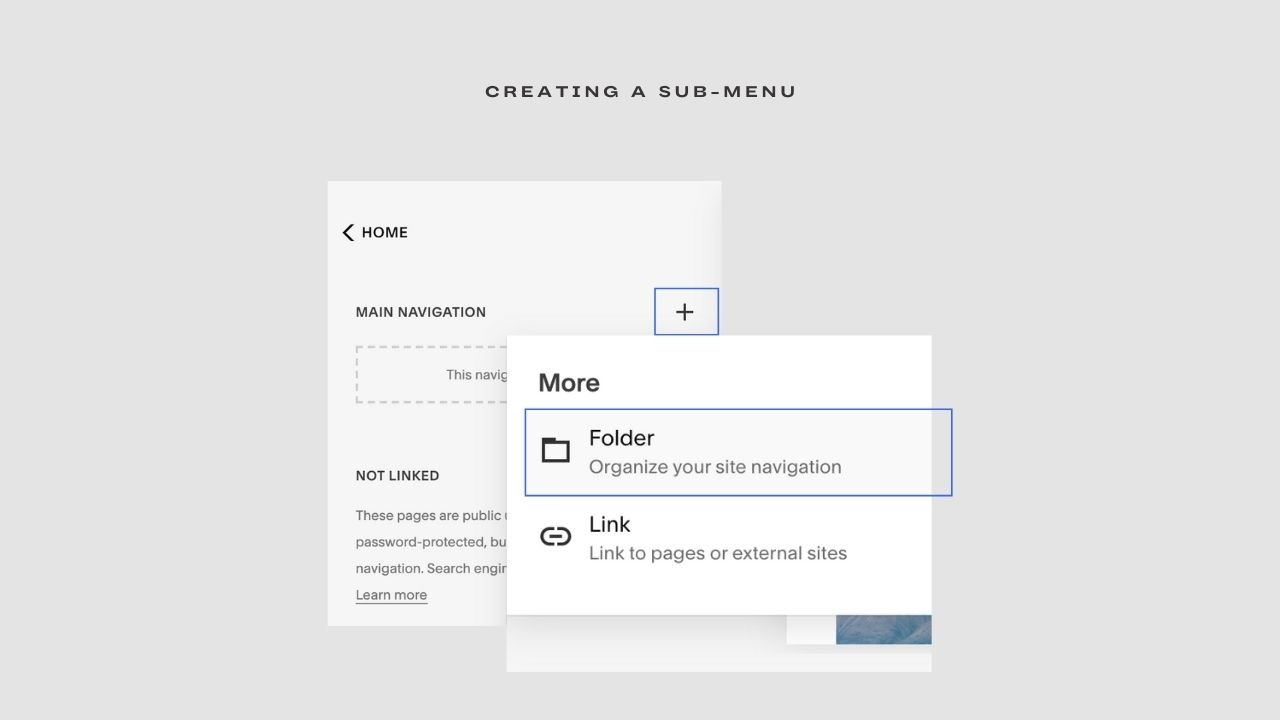
Sometimes, you may have to create more pages than the site menu can fit. In this case, you will have to create a sub-menu (that will appear as a drop-down menu). To do this, click on Pages, select the plus icon beside the main navigation, scroll down and select Folder.
Name your folder accordingly and start creating your additional pages under the folder.
edit Squarespace Pages

Now that the right pages are in place, it's time to restructure your page's content and style until it fits your site's brand. This means replacing demo content, adding, moving and removing sections and blocks. When it comes to editing your pages, Squarespace has made it easy. A Squarespace page is made up of blocks and sections that are easily editable. We will get into that in a minute.
To start editing a page, click on the page and select EDIT in the top left corner of the page. Once in the edit mode, there are several options to choose from. For starters, you will notice that a small settings panel appears whenever you hover over a block.
Click the Pencil icon to adjust the format; content alignment, section height, and width. Colors to change the background color of the section, and background to adjust the background image, video, or art.
The double square is meant to duplicate the session, and the arrows are meant to move the section up and down the page.
To make any form of adjustment to the text, all you'd need to do is double-click the text, and the text settings will appear.
The Add Section allows you to add premade sections such as video, gallery, menu, quotes, contact, donations, newsletter, tour dates, calendar, charts, etc. These premade sections save a lot of time and can make your design process seamless.
The plus icon also allows you to add sections to your page.
Some of these sections include a search bar, social links, spacer, accordions, and so on. You can as well embed lines of codes if necessary.
Always remember to select done and click save whenever you are done editing.
Individual page settings
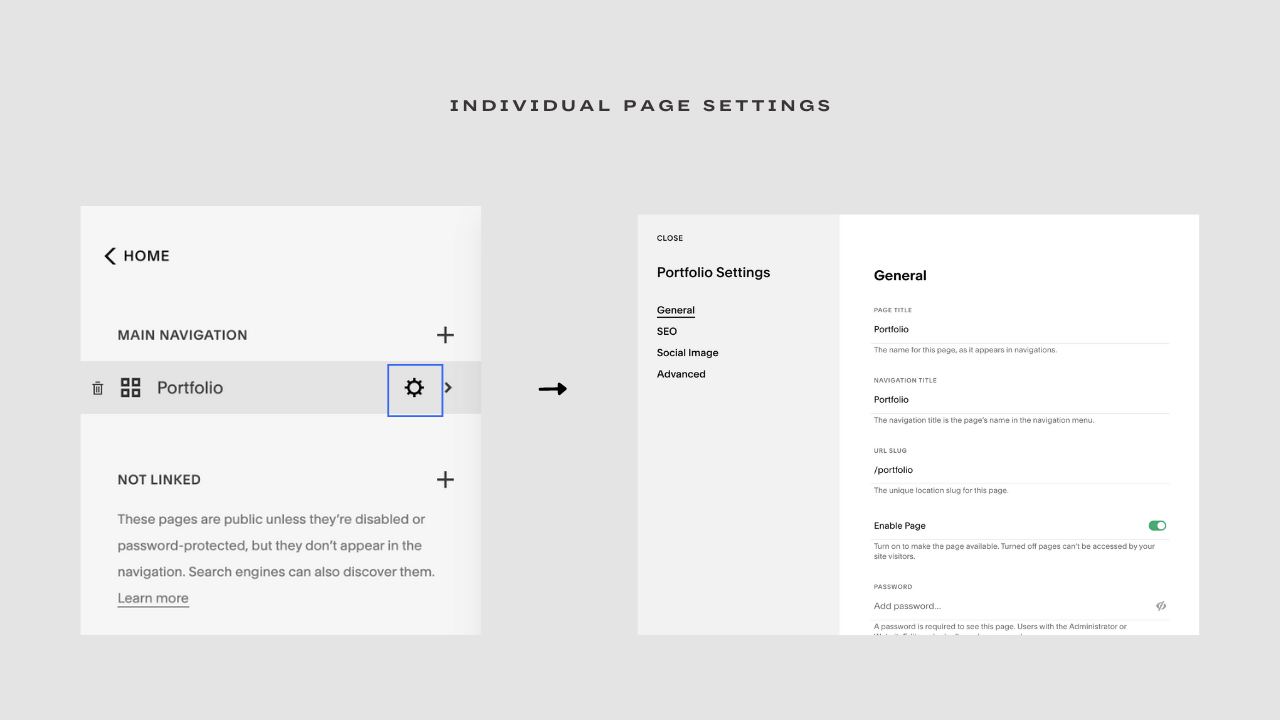
Who said you cannot customize individual pages? In the page settings, you can optimize each page for SEO, enable and disable a page view, add a social image (an image that will appear when you share the page's link on social media) and inject code if necessary. To do all this, hover over the page and click the gear icon.
Tips:
Make sure you optimize each page's SEO for ranking on search engines
Let your URL slug contains the keywords you want the page to rank for
Use a clean image as your social image.
Always remember to name your page titles correctly.
Once you are done editing your pages, make sure to select Done at the left corner of the page and click Save.
Step 4: Design & brand your website
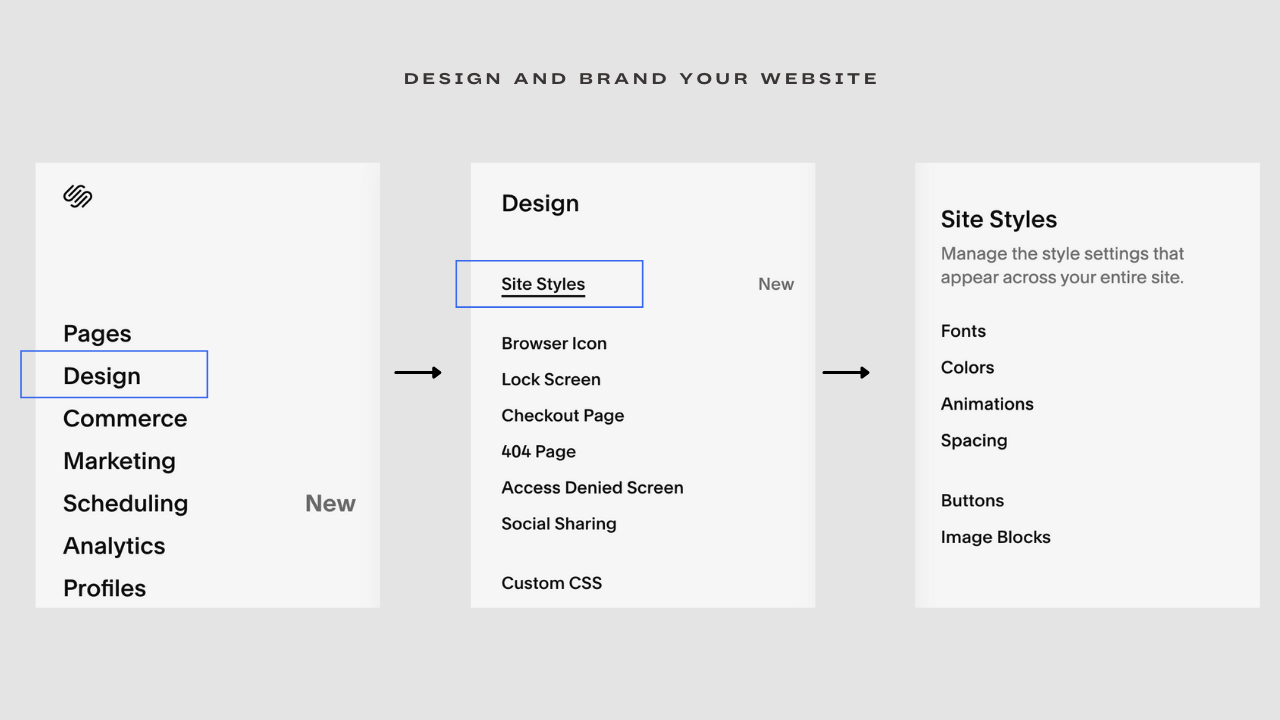
Now that you are done putting up pages, structuring, and adding sections, it's time to design and brand your new website. Creating your website with Squarespace so far has been a walk in the park, designing your website won't be a difference.
When it comes to Squarespace, you have a handful of design options to make your website look chic. Let's get right into it.
From your Squarespace website main menu, click on Design
Fonts and Colors
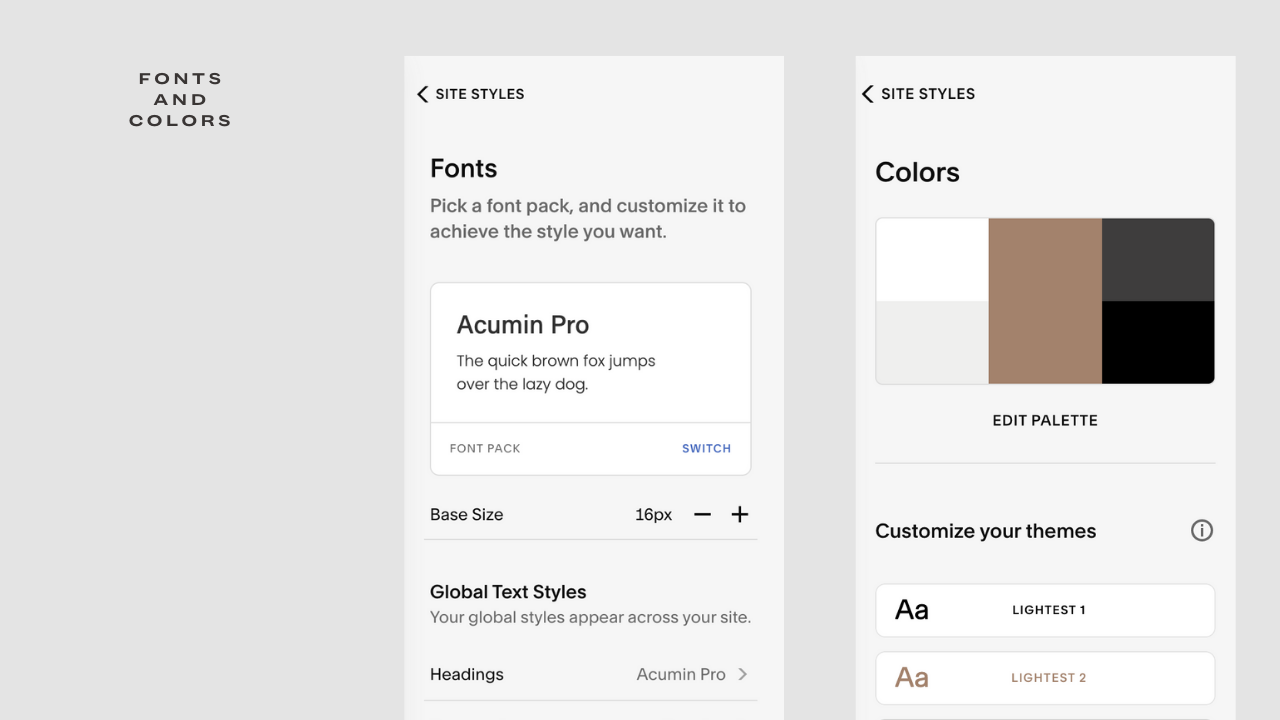
Who said you can't use a font combination that you love? On Squarespace, you have access to hundreds of fonts that will suit your business needs. Not just that, you can also upload your custom fonts to Squarespace if need be.
here's how to Add Custom Font To Squarespace Website tutorial.To edit your fonts, go to Design and click on Site styles. From there you can access Squarespace font packs consisting of hundreds of fonts. These fonts are classified as Serif, San Serif, and mixed. You have the chance to try as many font combinations as needed until you find the one you love.
You also get to customize the fonts of each element, i.e. you can choose different fonts for your button, headings, paragraph, and miscellaneous. Although, I would advise you to stick to at most two fonts on your entire website.
Not sure of the fonts to use? Here are the 16 Squarespace Font Combinations For Your Business.
Create your color palette in the Color section. Squarespace provides arrays of color palettes to select from. There's an option to upload color, draw colors out from an image and customize your theme for specific elements.
Add some Animation to your Squarespace website
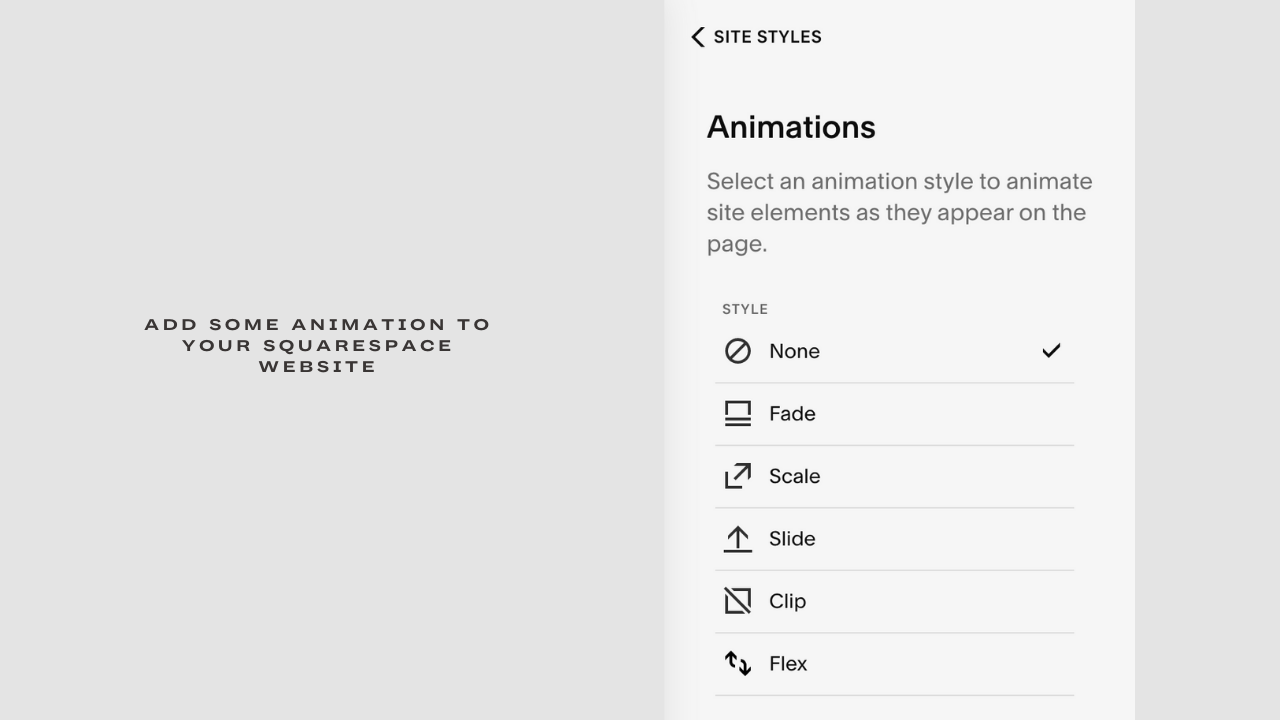
Whether you want your text to slide in as visitors scroll or you want it to fade in, Squarespace provides a number of animations to spice up your website. Want it fast or slow? Squarespace got you covered! You can try these animations out to find the one that intrigues you.
Increase your page's width and site margins with the Squarespace Spacing option.
Buttons and Image blocks

Buttons also have their own styling options. You get to choose the style; whether you want an outline or solid fill, shape, and padding size of your buttons.
Under image blocks, you can make changes to your content and image settings.
Other design settings
Browser icon: Also known as a favicon are tiny icons that appear beside your website's tab when your website is bookmarked or comes up in search engines. The default browser icon that comes with your website is the boring black cube, and it'd be nice if you can change it to increase your brand consistency. I've got you covered in this article on How To Add Squarespace Favicon To Your Website.
Lock screen: You get to decide what your site visitors see whenever they land on a password-protected page on your site. There's an option where you can change the layout, select a logo, add some heading and text, add videos and images.
Checkout pages: This is where you design the checkout page that will be displayed to your visitors. You get to change the background color, add a logo, and make minor tweaks to text and alignments. You can skip this if you're not planning on opening an online store.
404 Page: This page is displayed when visitors try to access a page with a broken link or a page that doesn't exist. Although it comes with a default setting, you can decide to edit it to fit more into your brand.
Access Denied Screen: This is the screen visitors see when they land on a member-only page. This can be customized for each of your member areas.
Social sharing logo: You can add an image or logo that people will see when a page's URL is shared on social media. Collection items like blog posts will use featured images.
Step 5: Set up your SEO (Search Engine Optimization)
Creating a beautiful professional website is not enough at this time and age. Your website must be optimized to appear on search engines to generate traffic, reach more prospects and increase sales. That's where Search engine optimization (SEO) comes in.
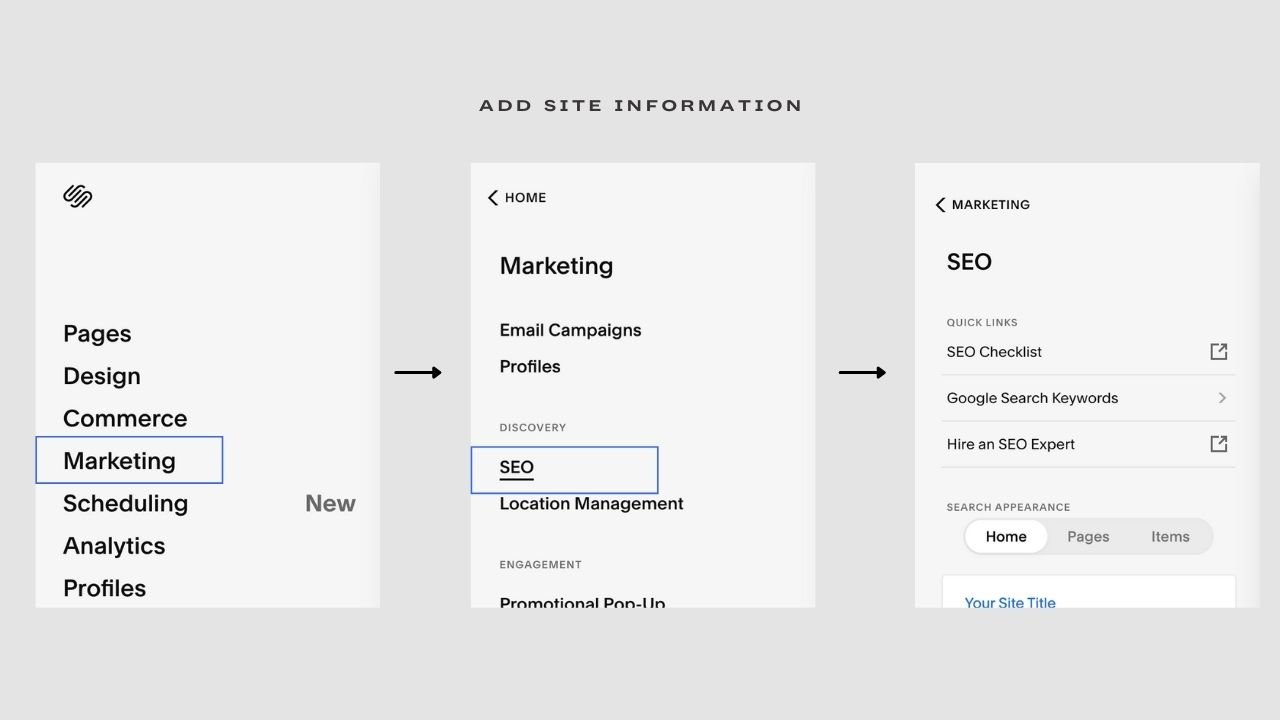
Although your website's ranking depends on how you optimize your content, Squarespace provides a checklist and an avenue to hire an SEO expert. All you need to do is go to Marketing > SEO to find out.
Also, on Squarespace, you can determine how you want your website and pages to appear on search engines. Hover over the page you desire, click the gear icon and select SEO where you can edit your site title and site description.
Step 6: Add site information and configure key settings
Website created? Check. Pages setup? Check. Content added? Check. Your site is almost ready! But before you launch your site, there is some necessary information that should be added to make your website complete. Let's get right into it.
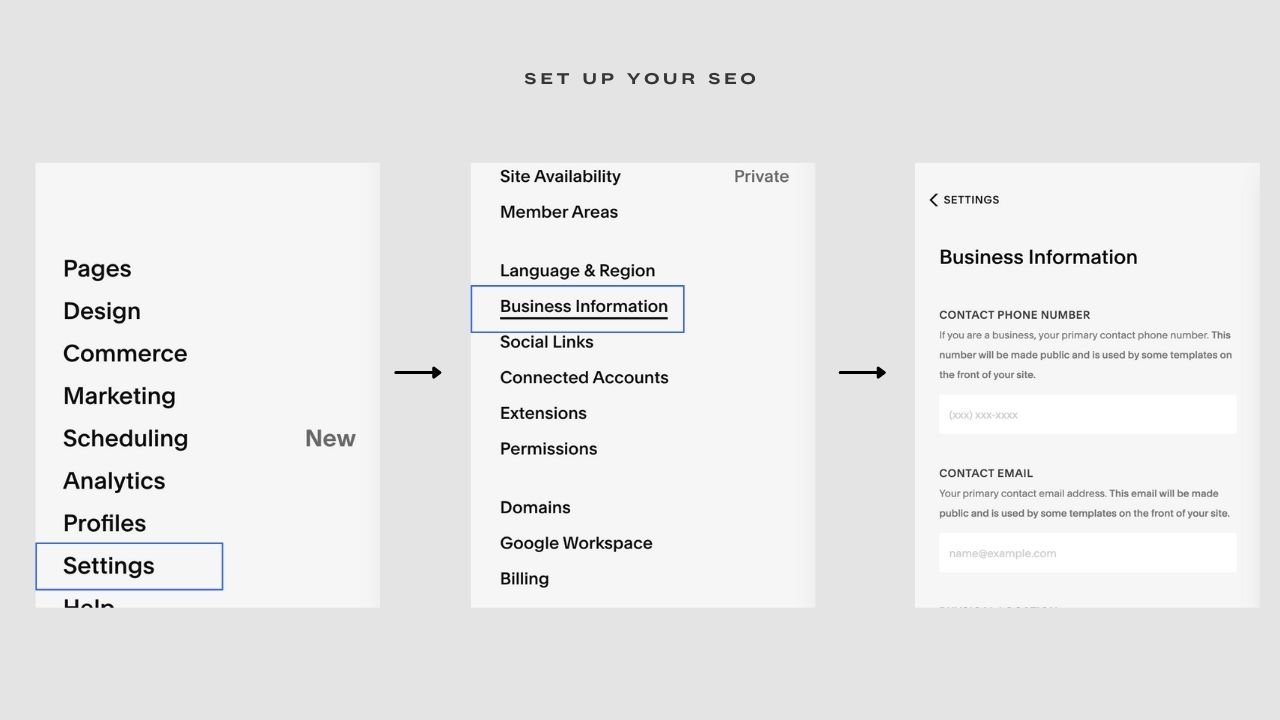
Language and Region: You can set your language, region, and time zone under this. Setting up your language and region lets search engines match your site with locals. To do this, go to Settings > Language and Region
Business information: You don't want to ignore this. This is where you get to fill in important information about your business such as contact phone number, contact email, business name, address, city, country, and business hours. To access your business information, head over to Settings > Business information.
Social Links: Here you get a chance to add your business' social media accounts that will be displayed as icons at the footer of your website. Adding your social details help visitors follow you on all your social media accounts.
Want your Instagram feed displayed instead? Learn how to display your Instagram feed or even a specific Instagram post on your Squarespace website: 3 Ways To Add Instagram Feed To Your Squarespace Website.
Domain Name
The last piece of the puzzle is your domain name. Your business domain name is your site address. For example, in Kseniia Studio, my domain name is kseniiakrasilich.com. On Squarespace, there are a few options to get your custom domain.
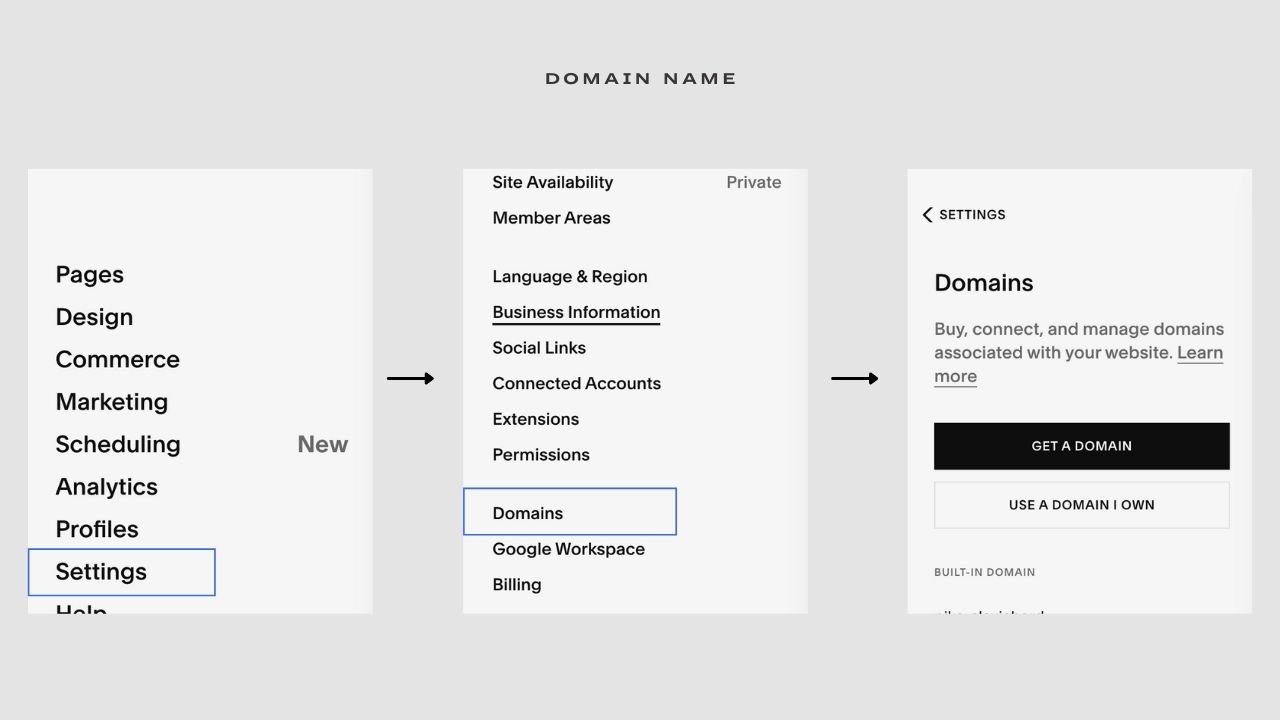
You can decide to use your domain name if you already have one, or purchase a custom domain from a third-party site. All you need to do is head over to the backend of your site, click Settings and scroll down to select Domains. From there, select Use a domain I own, and Squarespace will take you through the necessary processes.
If you do not have a free domain, you can get a domain name through Squarespace. This will be higher than purchasing it from a third party, but it's convenient. To get your domain through Squarespace, go to Settings > Domains > Get a domain.
When you purchase Squarespace annual plan, you get a free domain name for a year. This method saves you cost in the long run and can make managing your site a little easier.
To do this, opt-in for an annual plan (we will cover this later in the article) and head over to Settings > Domains > Get a domain
Step 7: Preview your Squarespace website
Your site will be private when you are still using Squarespace's two-week trial That is, it won't appear in search engines and anyone with the web address will not be able to view it. Rather, they'll be taken to a login page.
Nevertheless, you can allow friends and family members to check out your new site to give constructive feedback. That is why I'll suggest setting up a site password. Anyone with the password will be able to access your finished website and give necessary feedback.
How to set up a site password (site availability)
Head over to Settings, select Site availability, and change the view from Private to pass-word protected.
One last thing, remember to change it back to public view when you finally launch your website.
Step 8: Choose a Plan
Squarespace offers varieties of plans depending on your business needs. The more sophisticated your website is, the higher you'll have to pay. Let's get right into it.
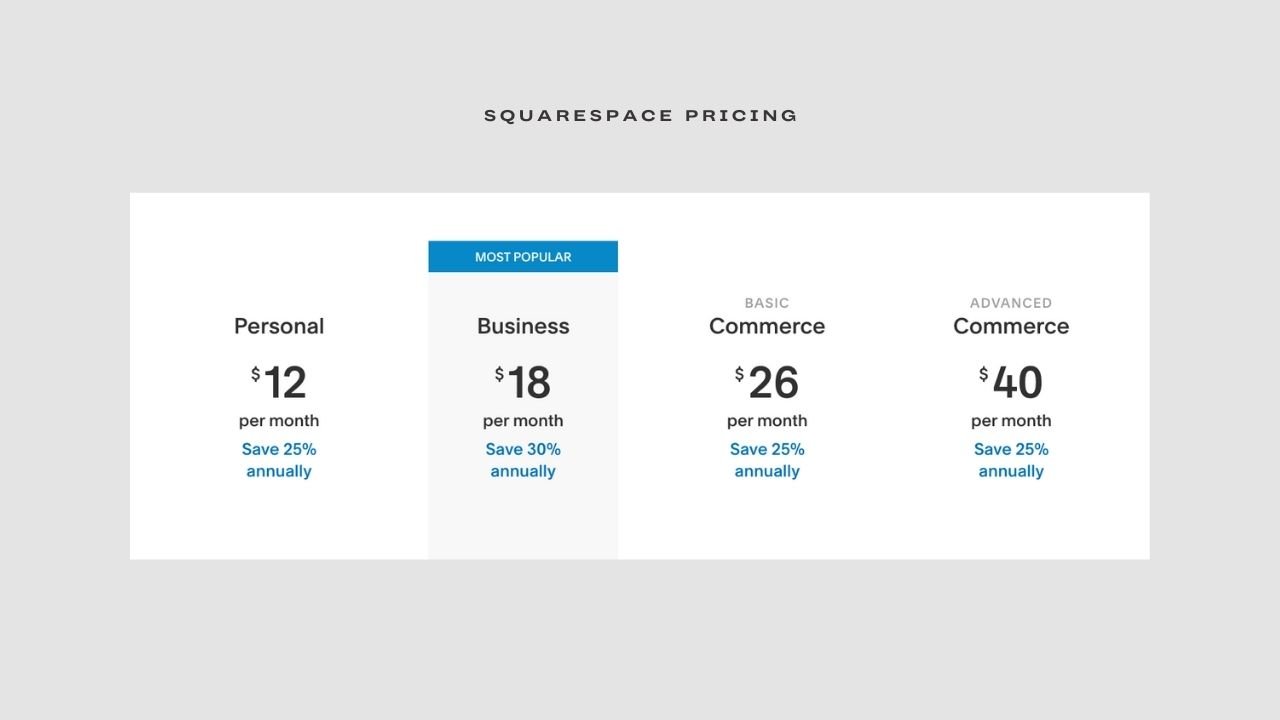
Personal plan ($12/month - Annually) ($16/month—Monthly)
In the personal plan, you get access to all the basic requirements of a website such as unlimited pages, 24/7 customer support, SSL security, analytics, and a mobile-optimized website. All features to design your website are available.
This plan is great for bloggers and individuals looking to build their portfolios.
Business Plan ($18/month - Annually) ($25/month—monthly)
At just $18 per month, you get access to Squarespace commerce (where you can sell your products), third-party integration like Mailchimp, code customization, and add unlimited contributors to your site.
This business plan is great for small business owners looking to gain exposure, sell products, and build a brand.
Commerce Plan
The commerce plans are designed specifically for Squarespace stores and retailers and they consist of the basic plan ($26/month - Annually / $35/month—Monthly ) and the advanced plan ($40/month -Annually or $54/month - monthly).
The basic plan provides everything you need to run an online store seamlessly such as customer accounts, checkout on your domain, limited availability label, local and regional shipping, product reviews, and a 0% transactional fee.
The advanced plan, on the other hand, offers more sophisticated marketing tools such as abandoned cart recovery, automatic discount, carrier-calculated shipping, and subscription products.
There are different plans on Squarespace that you can opt in for based on our business needs. The next step before launching your website is getting a plan. It's important to note that opting in for an annual plan is cheaper than the monthly plan.
Step 9: Launch
Once you've selected your plan and paid for it, you are ready to launch your site! But before you launch, make sure you confirm that everything is in place. Does the mobile version work well? Squarespace has a mobile responsive feature, so you don't have to worry about building your website for a mobile version. To make sure you're satisfied with the mobile version of your website, click the mobile icon in the top right corner of your page.
Once you've confirmed that all necessary things such as your site title, copy, images, business information, and the likes are in place, you are ready to launch!
If you are an eCommerce store, you still have to hold on a little.
Step 10: Integrate marketing & eCommerce Features
Marketing
If you are thinking of selling products online, this particular section is for you, but if not, you can ignore this. To access these features, you must be subscribed to the Business plan at the least. Squarespace has some cool built-in marketing tools that we are about to explore.
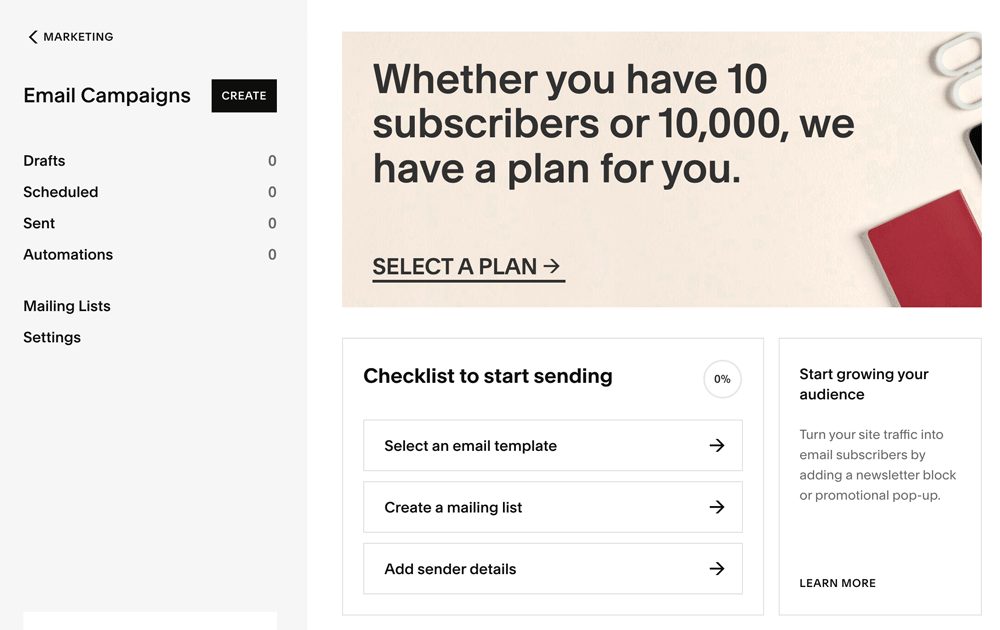
Email campaigns: The power of email campaigns as a marketing strategy cannot be overemphasized. We've seen the results countless times. You can create your email campaigns right on your Squarespace site, and Squarespace provided enough support along the way. You get to create, schedule and send your emails without integrating a third-party website. There's also an option where you can automate and manage your mailing lists.
Worried about your email template? Squarespace got you covered.
Promotional Pop-up and announcement bars: Familiar with the pop-up that appears on the website asking you to input your mail to get a freebie? Squarespace offers you an option to create a promotional pop-up that you can use to grow your mailing lists or generate leads, and announcement bars that will display across the top of your whole website.
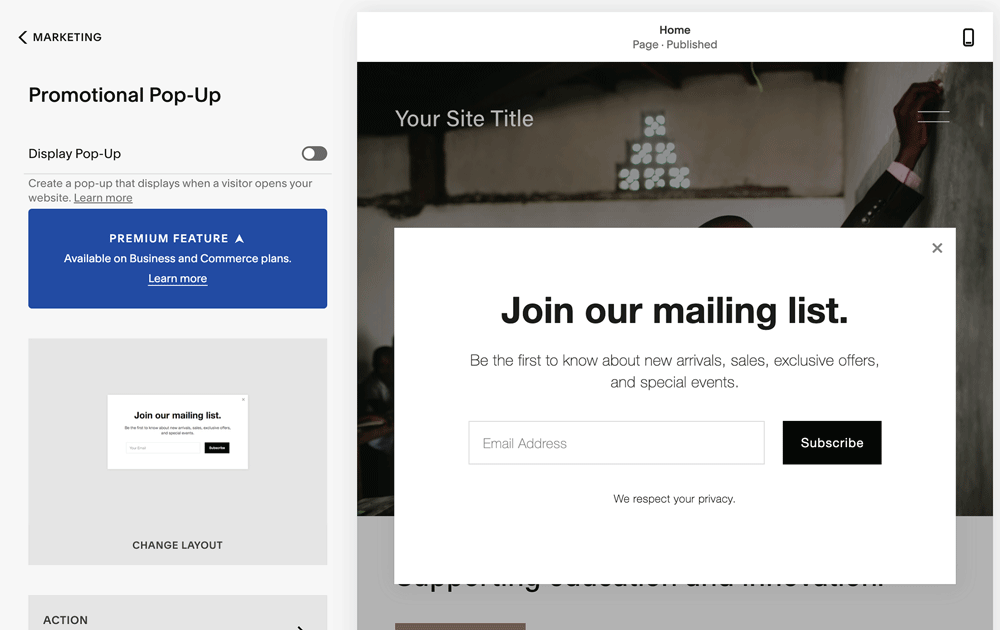
The announcement bar is really helpful when you want to inform your site visitors about a new product or service. To access this, go to Marketing > Promotional pop-up.
Products on Instagram: As Squarespace rightly explained, "You can use Squarespace's integration with Instagram Shopping to tag products in posts and stories. When you tag a product, Instagram users can view details and tap a View on the Website button to buy the product on your site.
This Instagram integration is a great way to reach your audience where they’re already spending their time, share products with followers, and attract new customers."
Facebook pixel and ads: Another useful marketing feature that converts is Facebook pixels. Facebook Pixel is a tool that tracks visitor activity on a website to help Facebook understand and target users for ads. For example, if a visitor views a product, Pixel can read that information, so you can show ads for the product to that same visitor.
Facebook Pixel is a helpful integration for any business, whether you’re selling products or want to drive more traffic to your site.
Pinterest Save buttons: You can enable rich pins (a Pinterest pin displaying extra information about your content) that will display whenever a visitor hovers on any of your images. You can display it on your blog page or all pages on your website.
Other features include a URL builder that can be used to generate URLs for your paid advertisements and also Google Ads credit.
All these features can be accessed under Marketing.
Squarespace Commerce
There are great commerce features available to you if you are focusing on selling products and services. Do you run an online store? Check out this article on How To Set Up A Store On Squarespace. I covered the commerce feature extensively in the article. But let's run through some features available to you on Squarespace.
On Squarespace commerce, the first thing you will need to do is to add a store page to your website, all you need to do is head to pages and repeat the whole process outlined in the Adding a page section. of this article. But in this case, you'll create a Store Page. After that, upload your products to your store page and add the necessary information. You can find out how to do that here.
After then, you can manage your orders and inventory from the Commerce settings. You can also set up discounts and view customers.
Point of Sale: Squarespace partnered with Square, so you can accept mobile payments, credit cards, and cash. All you need is your Square account and a reader to pair with your iPhone or iPad to start selling. Although offline payment will be subjected to Square transaction fees.
Print on Demand: Print on demand works similarly to drop-shipping in the sense that you work with other manufacturers to deliver products without having the product in stock. The only difference is that the products are not manufactured until an order is made, saving you from unnecessary payments. Squarespace provides integrations such as Printful and Printique that will help your POD business run smoothly.
Product Reviews: You can request and show reviews on your store. There's also an option where you import reviews directly from Etsy. Product reviews have proven to influence buyers' decisions, so getting positive reviews on your store is a great strategy.
Set up Payment: Squarespace offers two popular payment processors; PayPal and Stripe. You can set up both to give your customers options to choose from. Head over to Commerce, scroll down, and select Payment. From there, follow the set of instructions provided by Squarespace to connect your PayPal and Strip accounts.
On Squarespace, the options are limitless. You can create shipping rules, tax rules, customize your customer notification emails, create mailing lists, customize your shopping cart style and so much more.
Website Design & Usability Tips
When designing websites, some simple rules are followed to make sure visitors don't cringe. Here are some simple design tips that can make a major difference to the usability of your website. Let's get right into it.

Use two to three fonts: I know you may have compiled up to five fonts that you totally love, and you feel would be a great way to beautify your website, but the truth is using anything more than two to three fonts will make your website look messy. So when designing, make sure you stick to two fonts throughout the website.
Space things up: Ever felt overwhelmed in a choked room? Me too! Unfortunately, visitors feel choked when there's a lot of information packed in a tiny page. Make sure to create enough white space between elements on your websites. It helps visitors digest information faster and give a smooth user experience.
High contrast between colors: Always make sure that whatever background color or image you are using, the elements on top of it stand out. For example, if you're using a bright yellow background, using white as the text color will be a bad idea. Always make sure that your text and other elements are visible and readable against the background.
FAQs
Can I start a blog on my Squarespace website?
A zillion yeses! You can host your blog directly on Squarespace without integrating a WordPress site. All you need to do is pass through the process of adding a new page. Under collections, select Blog Page, and your blog will be automatically created. Learn how to create your blog on Squarespace and post your first blog post.
Are Squarespace websites secure?
Yes. All Squarespace websites are by a free SSL certificate for security. This means you don't have to pay a hosting company to get SSL security. Your website is protected from hacks and all your transactions are secured. To make sure that your SSL is turned on, head over to Settings >Advanced > SSL.
Will I lose my Google rankings if I switch to Squarespace from WordPress, Wix, or other CMS
Switching platforms will hurt your SEO? How could it be possible? The answer to that is: not as bad you may think. The truth is, Google really doesn't care which platform you use—the end result will still be the same, the user gets to view the content found on your website. But your SEO ranking when migrating a website will probably take a small hit.
Can I use my .com domain on Squarespace?
Yes. It isn't compulsory to buy a new domain when switching to Squarespace. You can use your old domain at no extra cost. All you need to do is head over to Settings, select Domain, and click Use a Domain I own, and you are good to go.
How to Build a Squarespace website: A step-by-step guide
Whether you’re an online business startup or an existing brick and mortar company, building a website is one of the most important steps to take in terms of growing a successful and profitable company. A good website is the foundation for any business, but it is also one of the least understood marketing tools available. Creating a good website can be fun and exciting, but it can also be intimidating to people who don’t think they have the technical skills needed to build their own site.
If you are looking for help to build a custom Squarespace website for your small business, i am here to take this task off your shoulders. Get in touch with me today so we can discuss how I can make your business website dreams become reality.
