
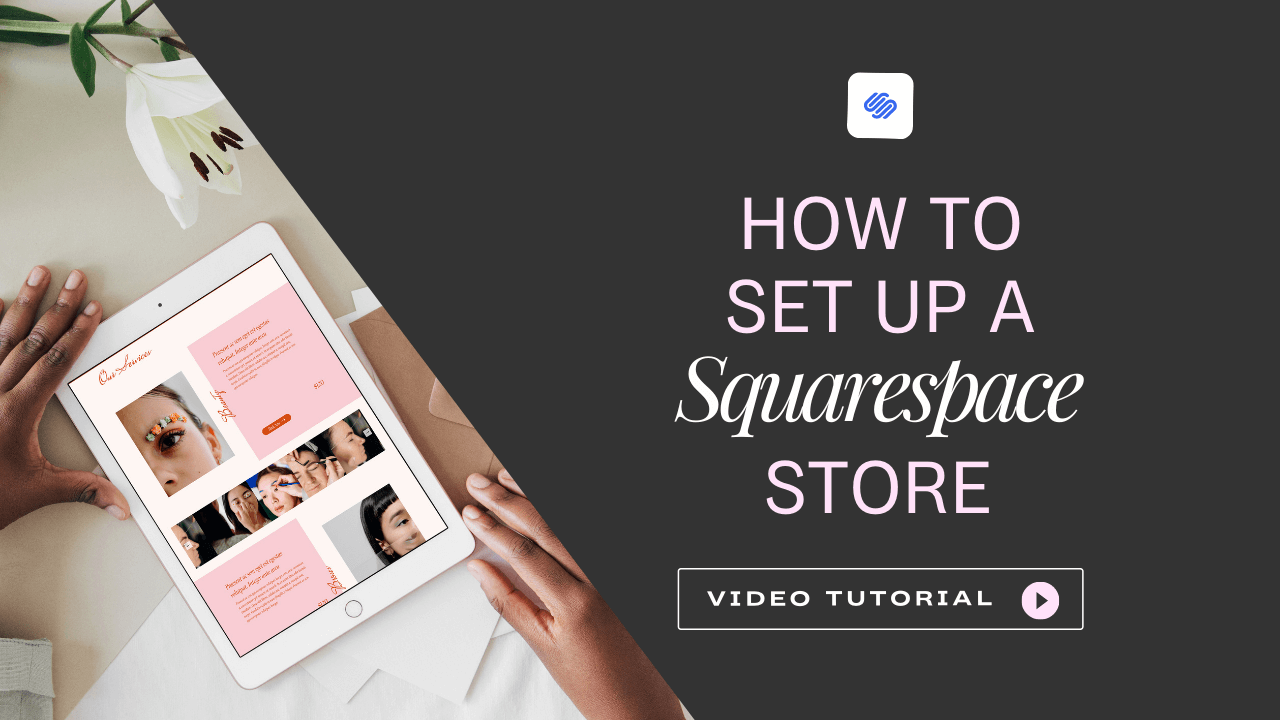
A complete guide to setting up a store on Squarespace (with video!)
Hey, lovelies! I am back with another comprehensive post to help you set up your store on Squarespace. Setting up a Squarespace ecommerce store can feel overwhelming when you consider the amount of time that would go into setting up product pages, figuring out what to do in your Squarespace backend(especially if you are a newbie). Trust me, I know that feeling.
That is why I decided to come up with a step-by-step guide on how to create your store on Squarespace, add products, prices, tax, and shipping rules and also answer possible questions that you may have.
Oh! did I forget to mention that there are some design tips for your e-commerce store outlined in this article? And if you are new to Squarespace, do not worry, I provided enough pictorial guide to get you familiar with all you need to know.
Just want to find out more about a particular aspect of setting up a store? All post's subtopics are compiled in the table of content below, all you need to do is click your way to where you want to read.

Looking for a unique website design for your business? Explore our Squarespace Web Design packages for a stunning website. Need to enhance your site's visibility? Our Squarespace SEO services are here to assist you. Curious about our work? Take a look at our Squarespace website designer portfolio for some inspiration!
-
Squarespace restrictions (limitations)
Video tutorial: How to create an e-commerce store using Squarespace.
Step One: Create your store page
Step Three: Connect a payment processor to your store
Step Four: Create shipping rules
Step Six: Other customizable settings
Key factors to consider when setting up Squarespace store
Squarespace is one of the best platforms where you can set up your online store but it is important to note that some limitations may be a major concern to your business. So, let's decide if Squarespace is for you and your business before we go any further.
Squarespace has successfully taken its place as one of the website builders that is DIY friendly and requires no coding background to set up a site. When it comes to Squarespace ecommerce, the site supports all basic features necessary to run a store seamlessly. However, there are a few things you should know
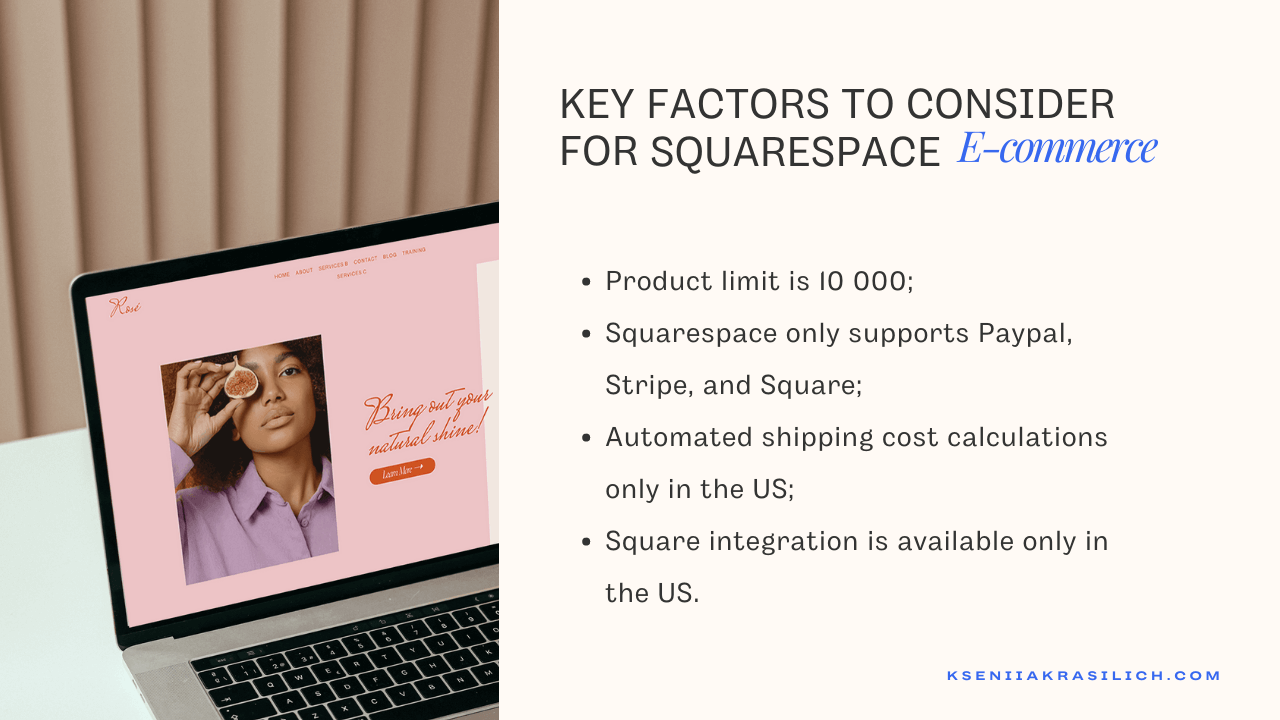
Product limit is 10 000: The number of products a Squarespace ecommerce store page can support is currently ten thousand, although ten thousand isn't a small number. If your store currently offers more than ten thousand products, then Squarespace may not be the best place to host your store.
Payment Options: Squarespace only supports Paypal, Stripe, and Square as the payment gateways at the moment I write this article. In case you live in a country where these payment options are not supported, Squarespace wouldn't be able to help. To add, Squarespace also do not support sales in multi-currency
Shipping and tax costs: Automated shipping cost calculations and automated tax cost calculation is only available in the US.
Integrations: Square integration is available only in the US.
Now that the few limitations have been spelled out, you will be able to decide whether Squarespace is the right choice. If yes! Let's proceed to the ecommerce plans Squarespace has to offer.
Squarespace commerce pricing plans
Compared to other ecommerce sites, Squarespace has affordable ecommerce plans that you can opt-in for. Let's get right into it.
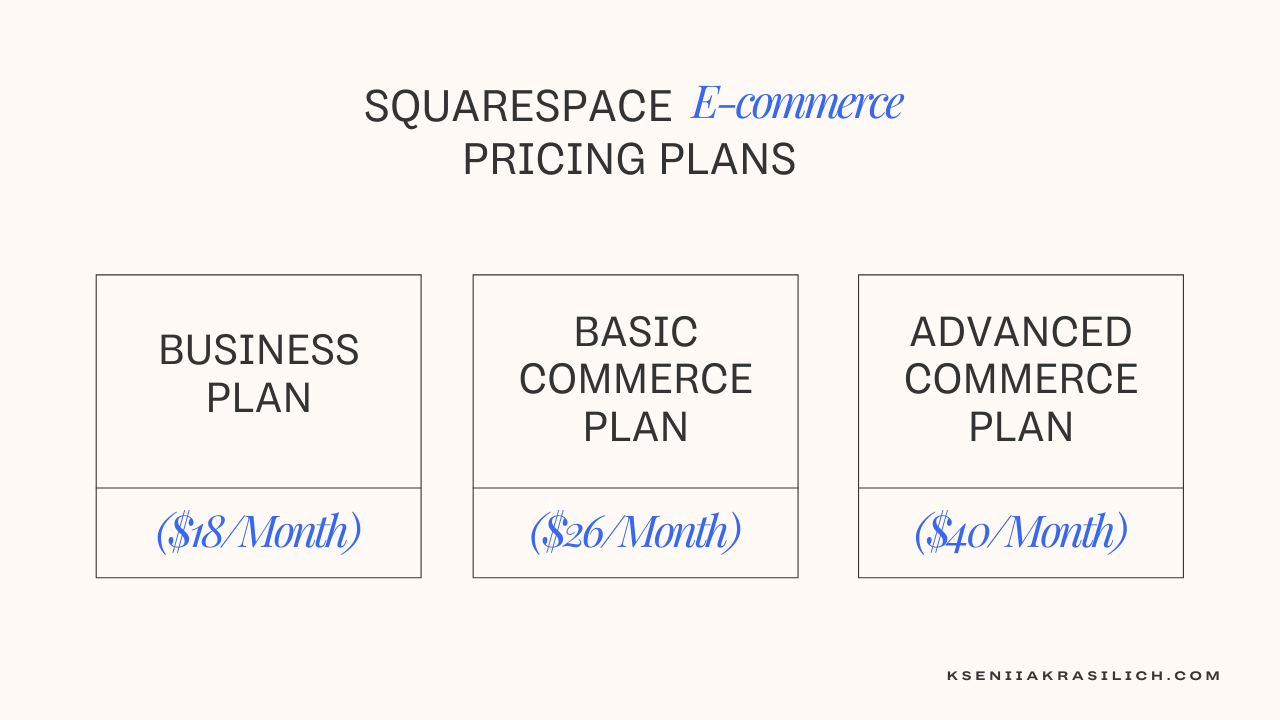
Business Plan ($18/month)
This plan is great for small businesses that have a low volume of sales per month and is on a tight budget. Although the sacrifice you will have to make is a 3% transaction fee on every sale. When you opt-in for this pricing plan, you stand to gain
Sell unlimited products and services
Accept donation through Stripe and Paypal
Sell gift cards
Basic commerce Plan ($26/month)
This is a plan for businesses that have a high volume of sales, prioritize a robust customer experience and Analytics. Unlike the business plan, there are no transaction fees attached and you get access to these basic commerce features
Have access to the POS feature
Users can create accounts for faster checkout
Ability to checkout on your domain.
Ecommerce Analytics where you can see your best selling products, sales trends, conversions, and general performance of your Squarespace shop
Display related products
Create a product waitlist
Manage inventory with spreadsheet bulk editing
Sell on Instagram
Limited Availability labels e.g. only three left
That's a lot of useful features the commerce basic plan has to offer if you ask me!
Advanced Commerce Plan ($40/month)
Designed specifically for large stores that need more advanced features for smooth running. In addition to the commerce basic plan, you also gain
Abandoned cart recovery
Sell subscriptions
Automatic real-time calculation of rates for USPS, FedEx, and UPS.
Control shipping options at ZIP codes level in USA and Canada
Automatically apply discounts
Custom integrations to the third party
Limited Availability label e.g. only three left
The commerce advanced plan is the main deal if your store is enormous.
How to create Squarespace ecommerce store ( Video Tutorial )
More of a visual learner? I created a detailed step-by-step video highlighting how to set up your store. Feel free to watch below
Want to read about it instead? Here is the detailed post explaining every step you need to take to set up your online store
create Online Shop on Squarespace ( step by step Tutorial )
Creating an online store on Squarespace can be a walk in the park as long as there is a guide to follow. I've listed six steps below that you can use to set up your store in no time.
Step One: Create your store page
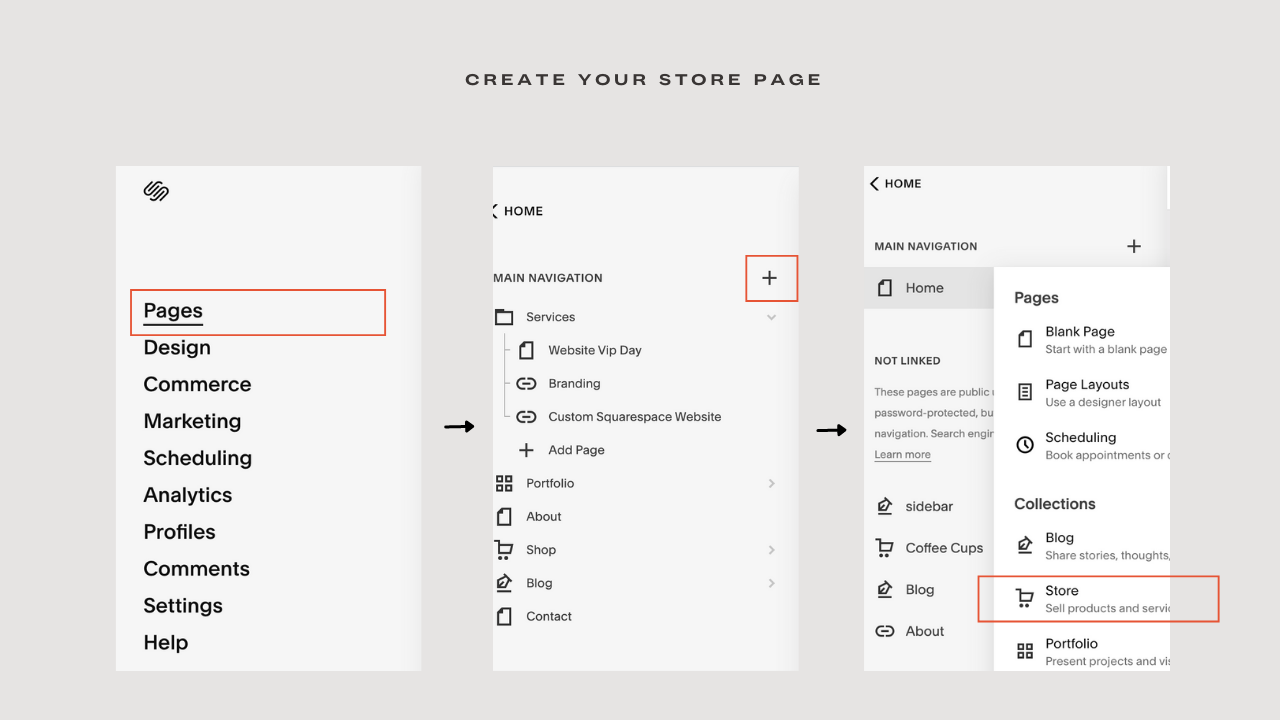
The first thing you should do is head over to the Editor or backend of your Squarespace site, Go to Pages. Make sure you click on the plus sign beside the Main Navigation and create a store page.
There will be two layout options. Go ahead to choose any because each layout is fully customizable. Once you choose your layout option, you've successfully created your store page.
Tip: Change the page title from 'store' to your store's name or keywords because just leaving it as store sounds too generic and won't give customers an idea of what your store is all about. For example, go for keywords like 'coffee cups' if you sell coffee cups.
Step Two: Add a product
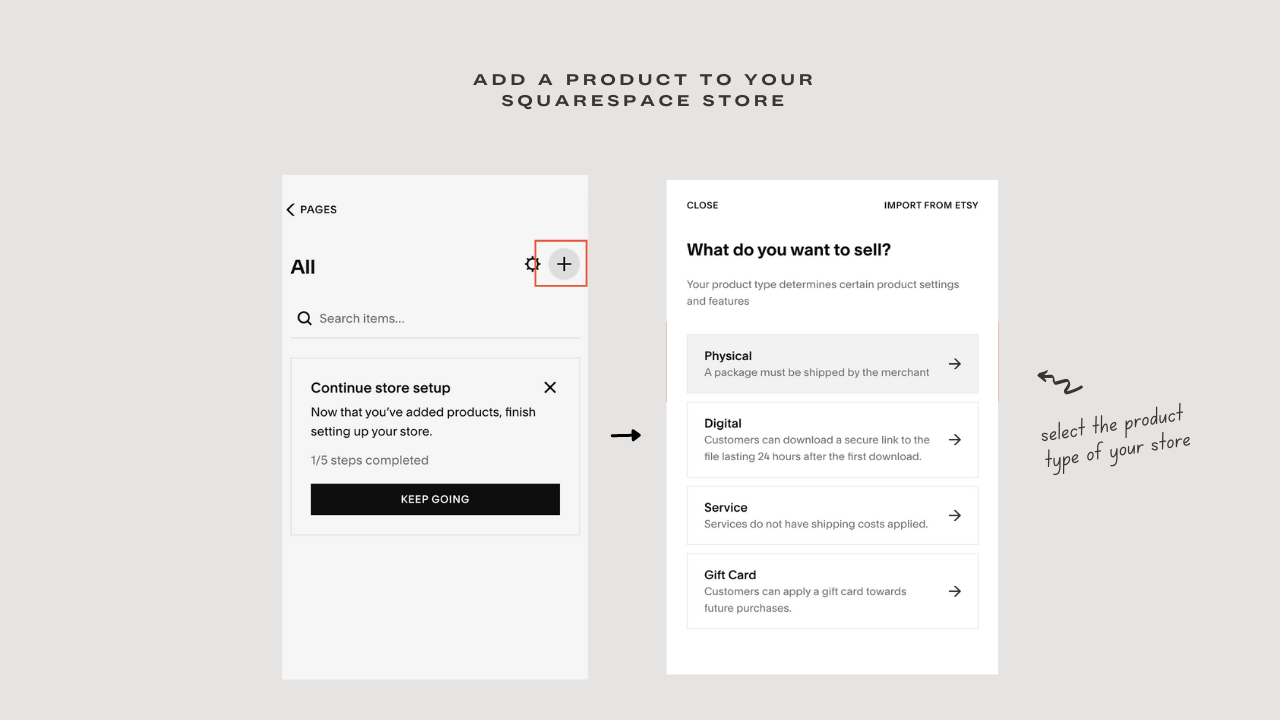
Now that you've created your store, it's time to add products. Your store would come with three demo products, I will advise you to delete them and start afresh. To delete, click on these three products at the side of your store and press delete.
To add a product, on your store page click on the plus icon beside the gear icon, you will be presented with four product types
From digital to physical products: what is available within squarespace commerce.
Physical : If you are selling physical products that require shipping directly to your buyers. Products like jewelry, electronics, and the likes fall under this category. These type of products requires you to add a shipping option
Digital: Products are in form of a download link sent to buyers' emails which directs them to a page in your site or a downloadable package. Examples are social media templates, ebooks, music, courses.
Services: Rather than physical or digital products, buyers get a service rendered to them in exchange for their payment. One on one consultation is an example of service products.
Gift cards: Just like the name implies, they are virtual gift cards sent electronically. It can be applied to future purchases in the store.
Whatever your product is, make sure you choose the correct product type. When that is done, all you need to do is to update the necessary information about your product.
Tip: Before you start adding products to your store, I will suggest that all the necessary product information such as images, product descriptions, and the likes are ready. Let's take a close look at each section
Note: There's an option to import products from Etsy, Shopify, and Big Cartel in case you have an existing store.
Edit your product name and description
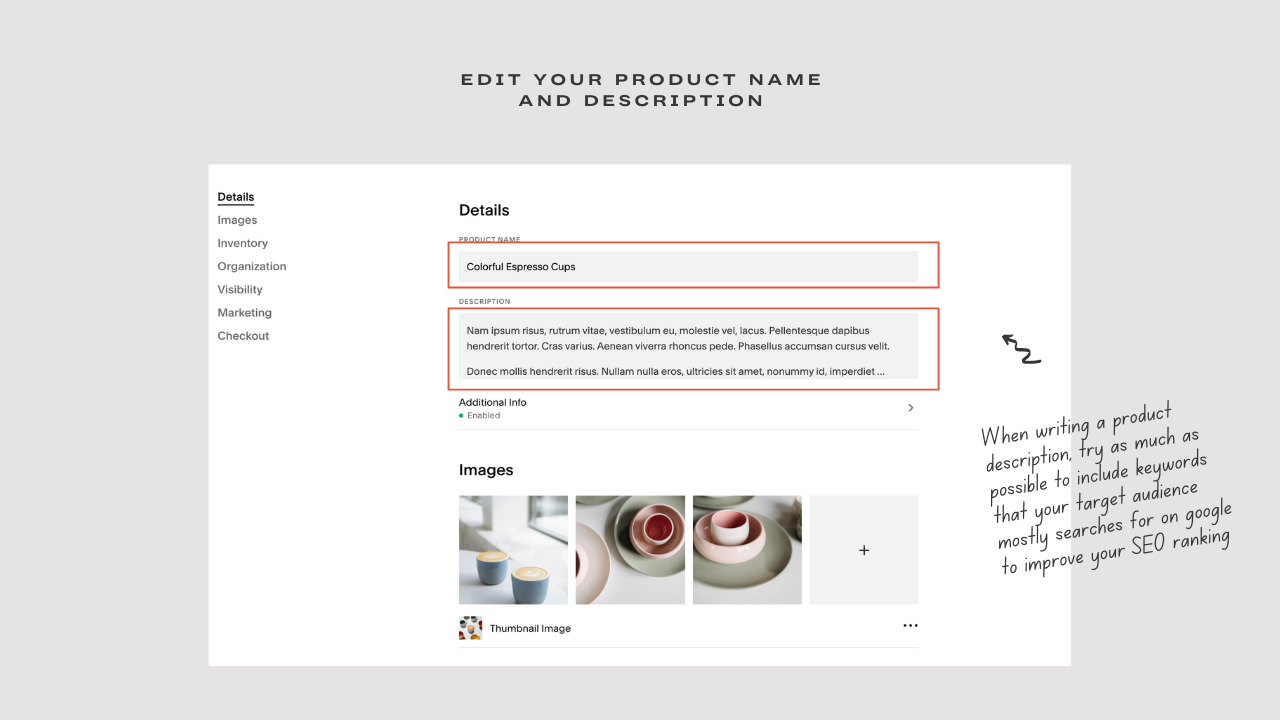
You want to start by adding some important product details such as the product name and description.
Squarespace Product set up Tips
For emphasis sake, make sure you input your keywords into your product name and description. Rather than write 'Louise Vuitton' as your product name, specify whether it's a Louise Vuitton bag or shoe.
When writing a product description, try as much as possible to include keywords that your target audience mostly searches for on google to improve your SEO ranking. Another helpful tip is to include important information (the size, shipping fee) and highlight the benefit of your product in bullet points. This helps buyers get an overview of what they stand to gain from your product. Overall, keep the product description short so that the Call to Action button is visible.
Additional info about Squarespace Products
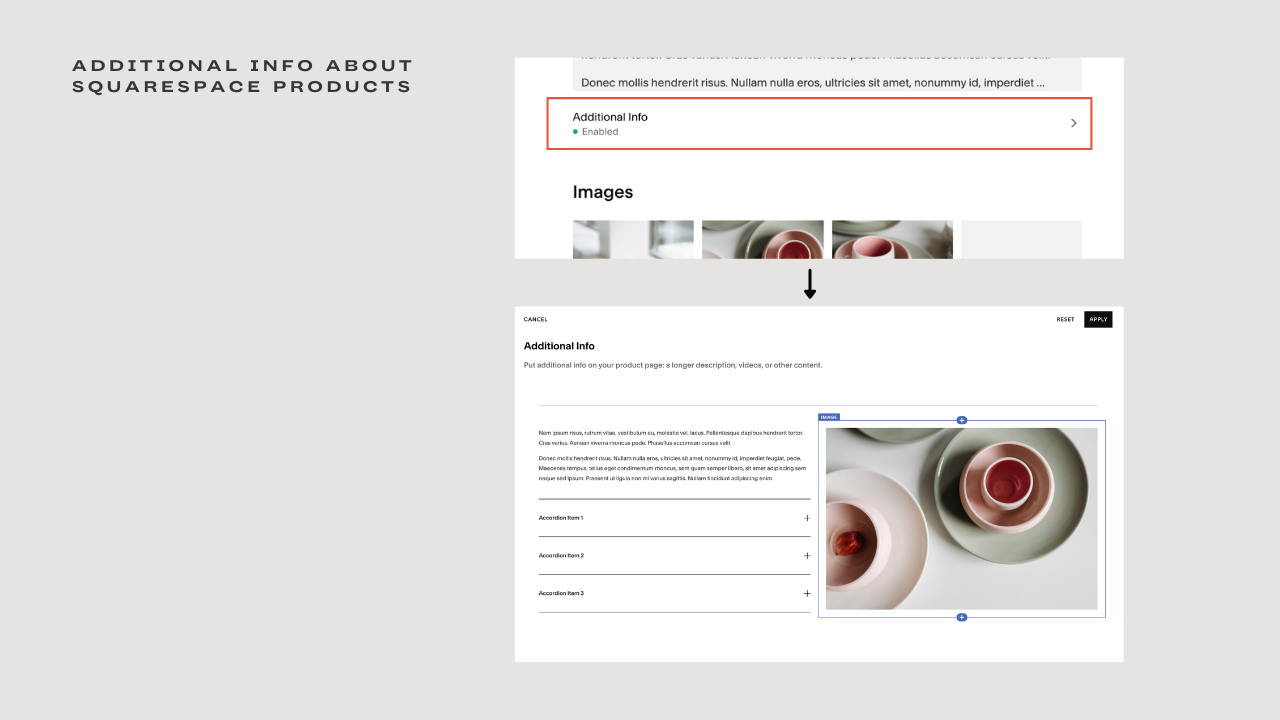
This page is where you can add other information that could not fit into the product descriptions. It is like any other normal page on Squarespace where you can add different blocks such as videos, images, galleries, social links, and the likes.
Tip: Adding a video tutorial of your product, a longer description, accordions or even testimonials can be an advantage.
2. Add Your Product Images
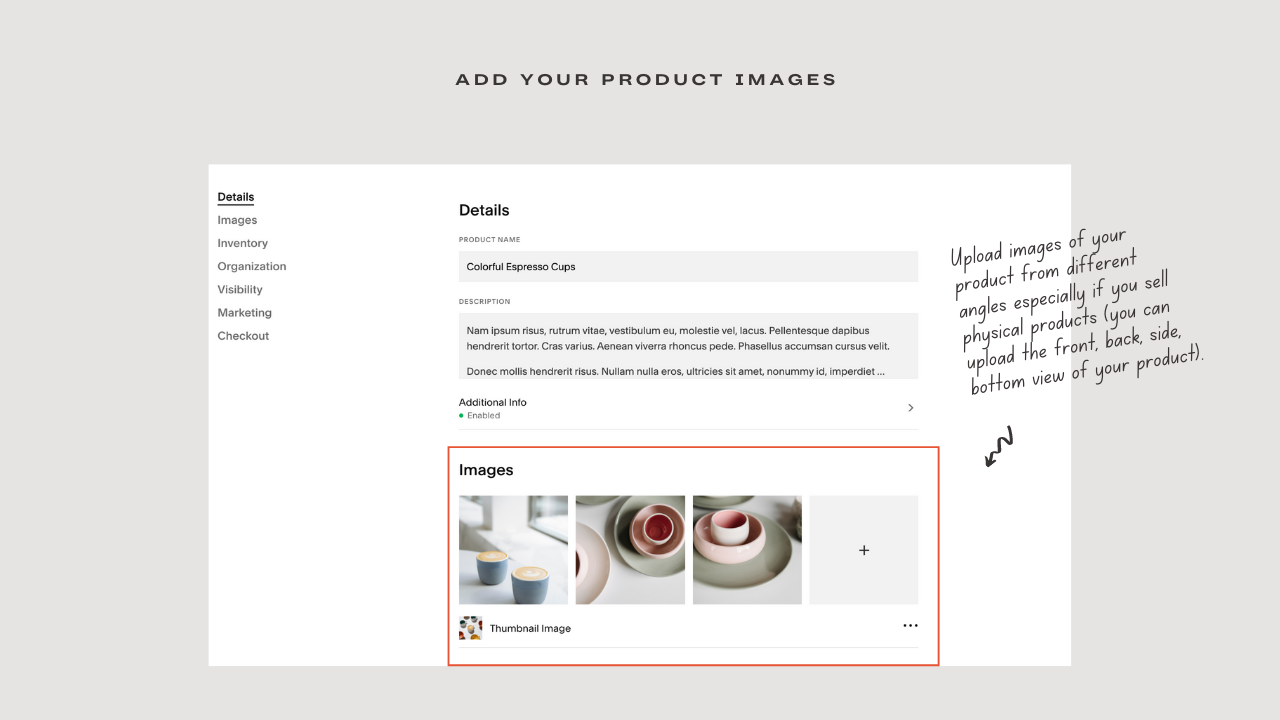
The next thing is to add your product images. You can add as many images as you need as long as they are optimized. Don't forget to set your thumbnail image.
Tip: Upload images of your product from different angles especially if you sell physical products (you can upload the front, back, side, bottom view of your product). The reason is that your potential buyer is interacting with your product for the first time and would want to get a full picture of how it looks like.
3. Add your store Inventory

Under this section, you get to add the price of your product, set it on sale or off sale by clicking the toggle bar. You can determine the number of products that you currently have and you get the chance to input your unique inventory number, although Squarespace automatically generates an inventory number for your products.
4. Create Product Variant
If you have different variants of the same product in your store, rather than create multiple listings for the product, it's best to create variants. Say you are selling cute teddy bears that come in four different colors; pink, white, red, and orange. All you need to do is to click Add under inventory and select the option of your variant whether Color, Size, Material, or Custom.
5. Add Categories and Tags
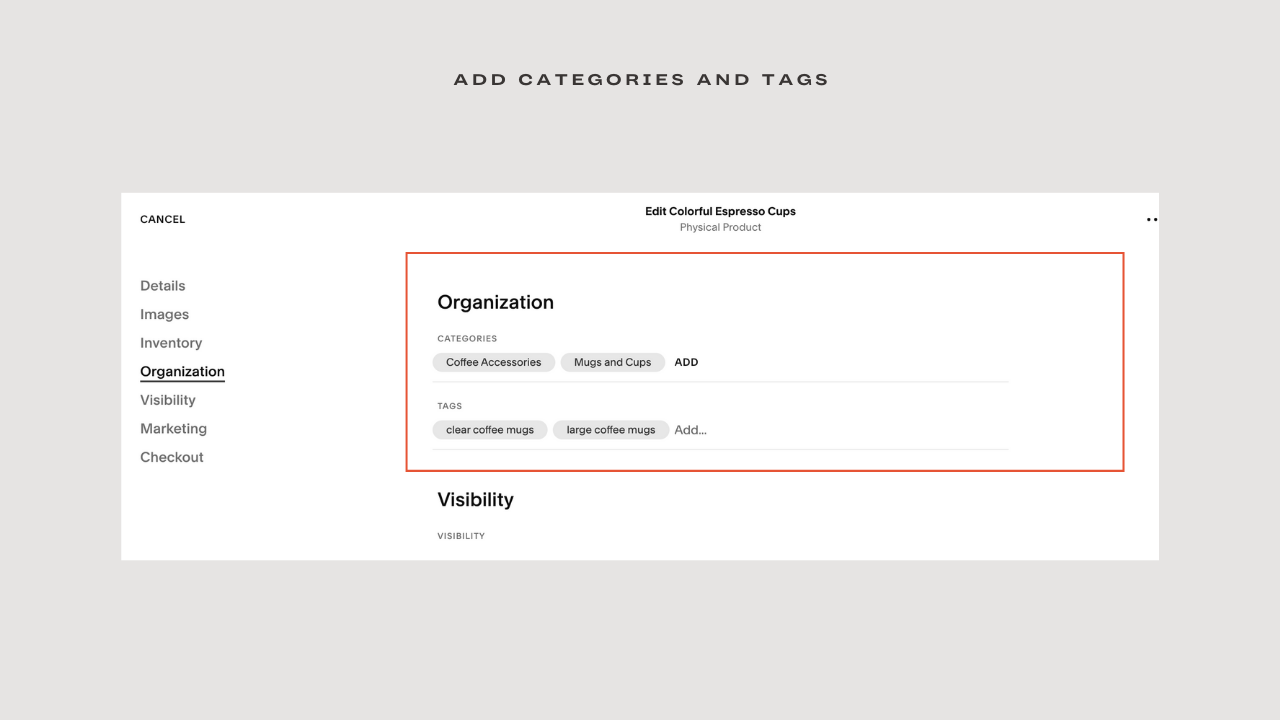
When it comes to adding categories, there are two ways you can go about it. The first method is to add categories to each product as you upload them. You will find this under organization when adding your product details.
Or you can decide to add your product category all at once in the store page settings.
To do this, go back to your store page and click the gear icon at the left panel, select Categories, and input all the categories you'll be needing. The only thing about this method is that you must make sure to link all categories to actual products.
Tags, on the other hand, can only be added to individual products.
6. Featured and related products
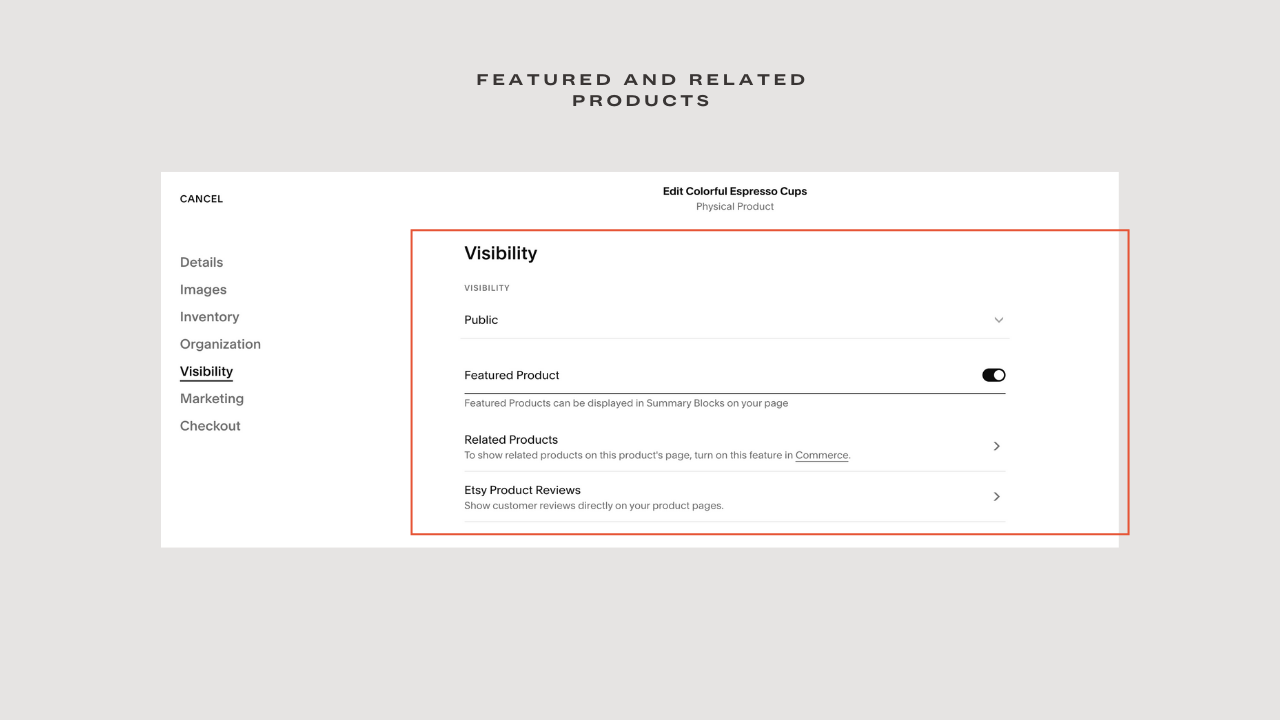
To make a particular product a featured product, you will need to turn on the toggle beside the Featured product. This product will be displayed in the summary blocks on your store page. You can also show Etsy Product reviews directly on your store by going to your commerce page on your Squarespace account Editor.
7. Optimize SEO and social accounts
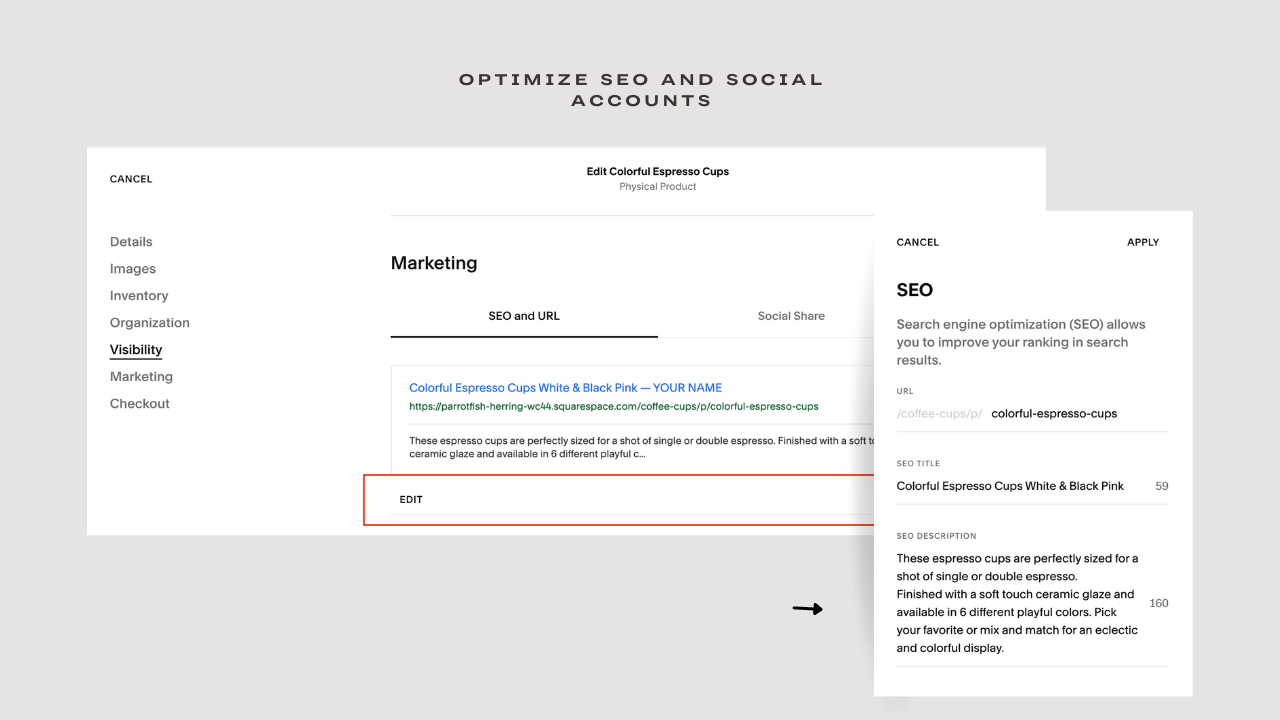
The importance of Search Engine Optimization popularly known as SEO cannot be overemphasized for a store. Luckily, Squarespace gives a view of how your shop page and individual product would appear on search engines.
Squarespace will automatically include some gibberish as your URL address. Make sure you edit the URL into something that relates to your product. For example, let's say you are selling an Italian waxed wood door, adding 'Italian wood doors' can make a major difference to your SEO rankings.
In the SEO Title, you can use your product title as your SEO title or add more words to it.
You can set the preview image whenever your products are shared on social media and also add your social media accounts when your products are uploaded.
8. Add custom buttons, forms, and subscriptions

Want to avoid the boring Add to Cart label? You can edit it under the custom button and input something more compelling like Buy Now. But try not to get too creative with your call to action button. Make sure your custom button is clear and compelling.
If your product requires you to know more about your customer, let's say you sell digital products that require an email address, physical products that need to be customized, or services that require you to know more about your client, custom forms will come in handy. Click on Custom Forms under Marketing and you can create your custom form.
There's also an option where you can create subscriptions if you sell products that require weekly or monthly subscriptions.
Step Three: Connect a payment processor to your Squarespace store
To choose a payment processor, head over to the backend of your Squarespace site, select Commerce, scroll down, and select Payments.
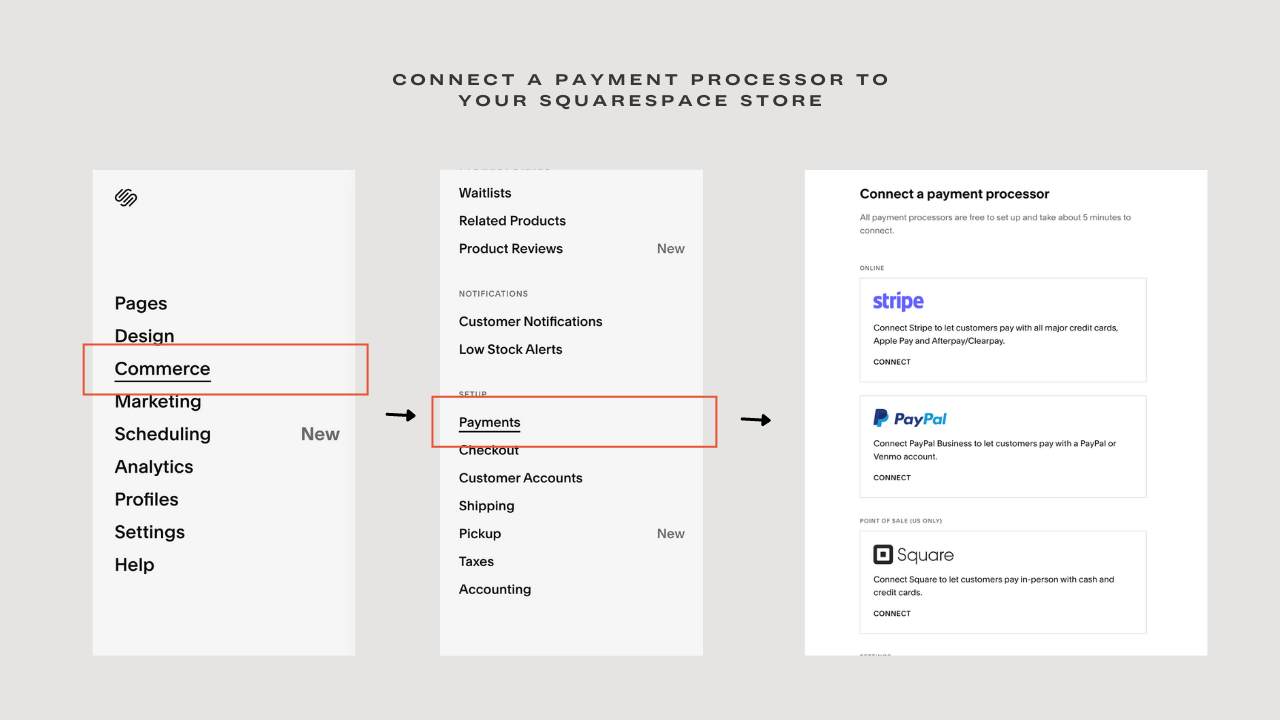
You will be taken to where you can connect your Paypal and stripe accounts following the set of instructions that will be provided.
Once you are done, you can choose whether or not to accept apple pay in your online shop. Here are some important things to take note of
Your store's currency is automatically updated to your PayPal's currency.
You cannot assign one software to process payments for a set of products i.e. assign Paypal as a payment processor for one product and stripe for another.
You need a Paypal business account
Step Four: Create shipping rules
To set up your shipping rules, head to the home menu of your Squarespace website, select Commerce > Shipping > Add shipping options

There are four shipping rates you can opt in for
Flat rate: You can set a fixed rate per order or/and per item. You can also add additional flat rates if you want to accommodate customers who'd like to pay extra for faster shipping. This option is great for stores that offer products with roughly the same weight.
Rates by weight: Weight-dependent shipping lets you set shipping charges based on the total order weight. You can also set the weight range and cost.
You can record the weight of your product as well. To do this, double click any product on your store and an editing menu will appear. In the Customize section, select Advanced shipping, there you'll be able to add values to Length, Width, Height, and Weight.
Carrier Calculated: Use carrier-calculated shipping to automatically calculate shipping fees based on FedEx, UPS, and USPS rates. While this is the best option to go for, it's only available in the US and advanced commerce plan.
Free Shipping: You can offer a free shipping discount for all orders or specific order that matches your discount criteria. For example, a 5 dollar off for any buyer who uses a specific discount code.
You can also create shipping zones to limit where you ship to
shipping rules Note
It's not possible to create product-specific shipping rates at the moment
It's not possible to quote a custom amount for shipping after checkout.
Squarespace has integration with ship station to enable you general shipping labels
Drop-shipping is offered through Printful and Spocket
You can learn more in this Squarespace article
Step Five: Set up tax rules
You can set up your sales tax by heading to Commerce > Taxes. Click on get started and then select the plus icon to start adding your tax rules. You can create tax rules based on your country, state, or ZIP codes. Also, note that tax with be deducted based on the shipping address for physical products and billing address for digital products.
Kindly note that this information does not substitute legal or professional tax advice.
Other customize settings
Your store is all set up now. But who doesn't like extra toppings? There are some other things you can set up to make your customer experience top-notch.
Squarespace Checkout Process
You can customize your checkout process to improve the usability experience of your customers. Here are some of the things you can do under the checkout settings.
Express checkout: If enabled, it skips the whole add to cart step and takes the customer directly to the checkout page. This is particularly helpful for online stores that offer one product. To enable this feature, go to Commerce > Checkout and scroll down to check the Express checkout option
Service Product Limit: You can disable the service product limit if you sell services. Once you are on the page menu, click Commerce > Checkout and uncheck the service product limit
Minimum Order Amount: To set a minimum order amount for your products, find the minimum order amount field under the Checkout page
Abandoned Cart Recovery: The abandoned cart recovery feature sends an automatic mail to site visitors after 24 hours when they add items to their carts but do not complete the check-out process.
Mailing list: You can enable this option if you want customers to subscribe to your Squarespace email campaigns/mailing list
Shopping Cart Style: There's an option to switch to a dark or light theme depending on your brand colors.
Default Country in Address field: Default the country where most of your buyers are located.
Shipping and Billing Address: Similar to the default country in address field, you can show the billing and shipping address by default.
Customize Customer notifications
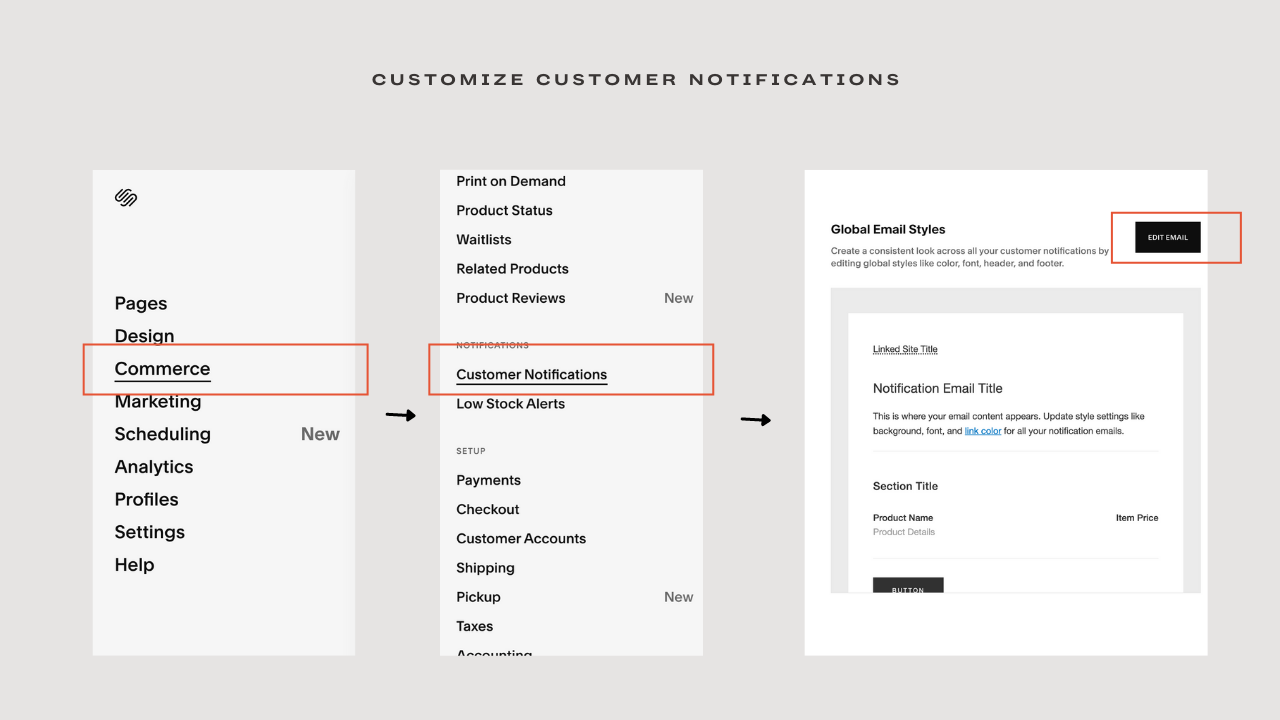
Under Commerce > Customer's notification, you can customize the following
Under the Global Email styles, you can add your brand colors, fonts, site styles and company's logo or the header to make your email professional
In General Orders, you can decide to change the default template to fit your business tone and voice.
Step Six: Test and Launch
Finally!!! You are done with the tedious process of setting up your store. But before we cut the ribbon, you should test your shop page and make sure everything is working fine. Squarespace provides a Test Mode option for you to test your site before launching it. To do this, Commerce > Payment > Test Mode. Once the test mode is on, you can experience your site as a customer, it even generates a fake credit card n the checkout process.
Once you confirm that everything is intact, turn the test mode off and launch your site! Congratulations!
Squarespace is a great website building platform, but it may not be the best fit for your needs. Check out these best Squarespace alternatives.
Online store design and usability tips
Creating a store is beyond listing products and adding payment processors. What guarantees that a customer purchases from your store over and over again is the user experience and ease of use of your site. And because I want to see your store thrive, I decided to list some common usability tips that can make a difference.

1.Provide a way to contact you
Many stores overlook this because they do believe that buyers just want to buy and the stores just have to sell. But most times, cases do come up where buyers would need to communicate with you. For example, let's say there's a delay in the time of delivery, chances are the buyer would want to know what's happening and when there's no way to communicate with the store, they'd conclude that you are either a scam or you do not care about your customers. We don't want that right? So, try to add your mail or even set up business hours when you can be contacted.
2. Add Social proofs
90% of consumers read reviews and testimonials before making a purchase according to a research by Invesp. Also, testimonials can boost the sale page conversion rate by 34%.
Let's bring it home, I am sure you read products reviews to make sure whether your decision to buy a product is right. Exactly why you have to add testimonials and reviews to your products.
It helps clear the doubts of buyers and the more positive the reviews are, the higher your sale conversion rates. Never hesitate to ask for reviews from those who have purchased your products and flaunt them shamelessly on your shop page.
3. Add filters and categories
Categorizing your products reduces the time spent searching for a product and increases the chance of purchase. Make sure you give your customers one less thing to worry about by categorizing your products and integrating a filter or search bar to reduce the time spent. Whenever you add new products to your store, remember to categorize them.
4. High-Quality Images
Using high-quality images for your products helps communicate to your customers that you value quality and excellence in your business thereby helping them trust that your products will be of the same high quality. So, try as much as possible to make sure that whatever image you will be using on your site is clean and optimized.
5. Include FAQs
I wish I could overemphasize this enough. FAQs are just like saying 'I know you may have this question, don't worry. I got you covered'. Try to take time out to find out possible questions customers may have about your store and products and make sure they are well answered.
Squarespace e-commerce plugins that will be of help.
This section contains affiliate link that would be of help to you and me
While your Squarespace ecommerce store will run smoothly, some small features are not currently available on Squarespace (like a countdown timer) that can make a great difference in your conversion rate. I will be walking you through some third-party plugins that will be of use to your shop page
1.Squarespace Show Inventory Plugin

Price: $15
Squarespace only shows the quantity for a product and not the variants. But with this plugin, you can specify the amount of quantity left for a specific variant of a product. This would inform customers about the quantity left and speed up their buying process, you can
set a threshold after which the indicator will be visible
change font and size
change a default template

This is a super helpful plugin for your store. It creates a sense of urgency and compels consumers to take action. You can use this for a discount promo, discount codes, events, and limited digital downloads. This countdown timer has been proven to be effective in the marketing field.
Ability to set an event after the timer expires
Ability to set a fixed time instead of the end date
Easy to customize

Price: $19 (standard license) $57 (business license)
This helps you display the second product image on hover. Useful if you want to give your customers an easy flow through your shop page. It works for
Product Page
Product Block
Summary Block with products
Price: $19 (standard license) $57 (business license)
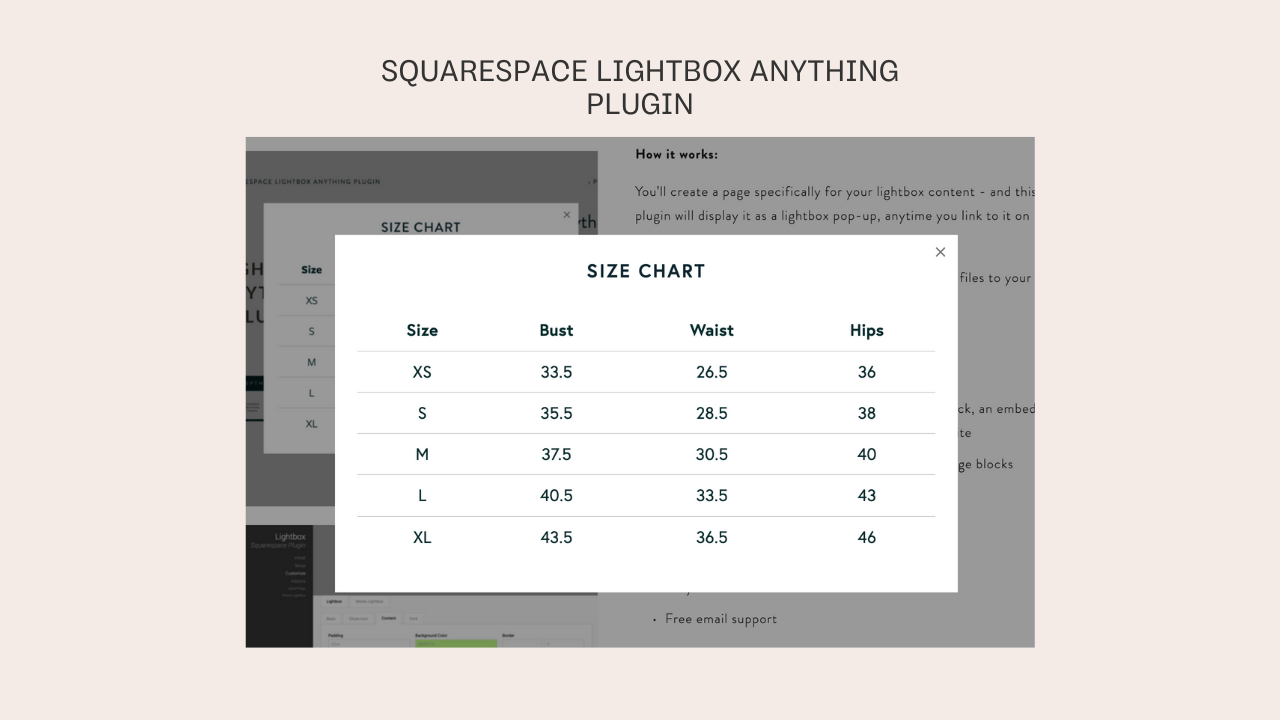
You can literally lightbox anything from your product descriptions to galleries, video pop-ups, charts on your Squarespace site. It usually gives an appealing visual satisfaction to your customers and also highlights important information without leaving the page.

Price: $50
Want to add a sleek vibe to your add to cart process? Slide out will give you that. Whenever a customer adds a new item to the cart, the cart list slides out in a sleek way displaying the new item that was added. You should give it a try.

Price: $50
Here's another plugin that would make your customer admire your smooth design. It displayed a mini cart containing the products that customers have added.
A complete guide to setting up a store on Squarespace
If you've made it this far, you are the real MVP. You've discovered how to create your store, (by the way, Squarespace supports multiple store pages), improve your store's design and usability, and get plugins that will enhance your store.
I hope you found this article helpful. If you did, kindly let me know in the comment section below. In case you have any questions, also drop them in the comment section.
